# Set up Approvals
Setting up Approvals for your organisation requires the following steps:
- Approvals rule - This marks Documents to require Approval
- Security groups and users that will use Approvals - This sets up the people who will be approving
- Default Approval group - This makes sure that there is a group to code the Documents
- Approval Chains - This establishes your Approval work-flow
- Account Codes - This is needed for integration to your financial systems
- Optional: Trading Partners - This is recommended for integration to your financial systems
- Optional: Analysis Tags - This is recommended for a better experience for your users
To set up Approvals, you must be an Administrator in DX2. You must be able to see the Rules, Security Groups and Administration modules of the website.
# Set up Rules
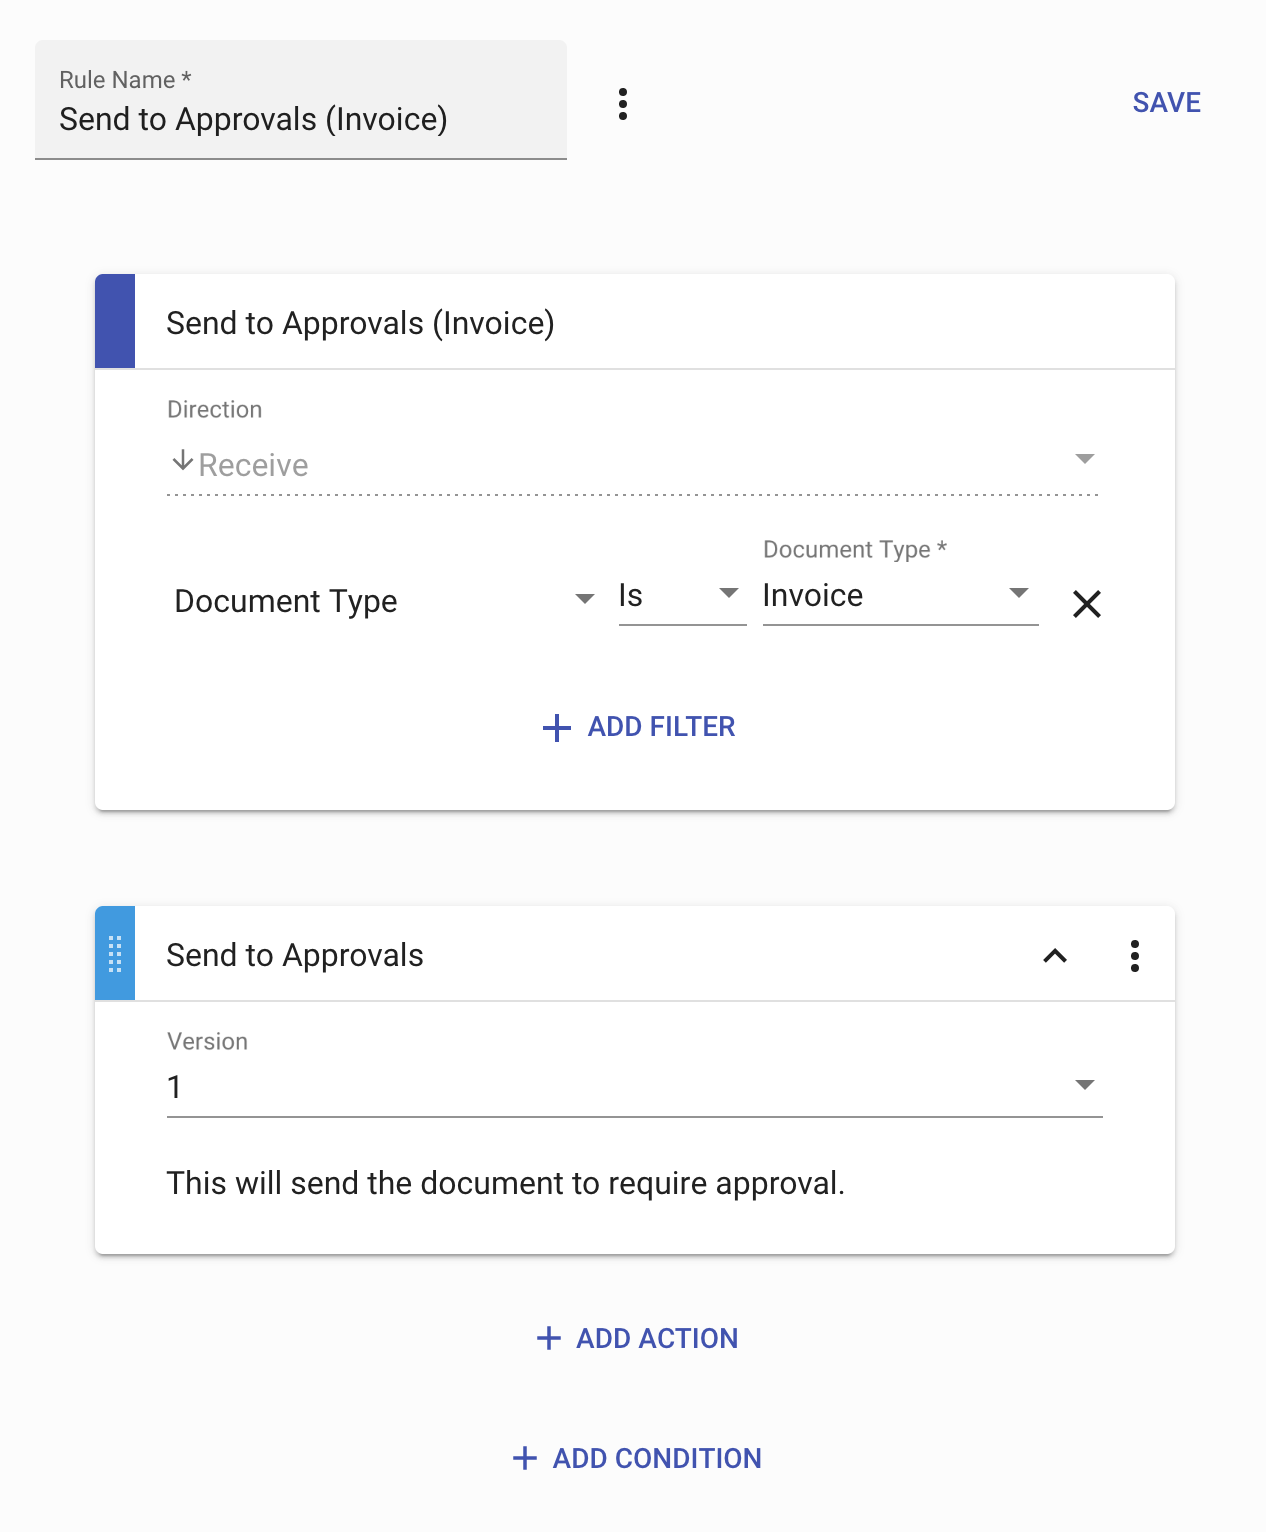
A rule is required to send the Document to Approvals. Go to the Rules module of the website and check for any existing rules which you may wish to add to instead of creating a new one. Simply add the Send to Approvals action using the Add Action button.
For invoices, the direction should be Receive and a filter should be added for Document Type: Invoice. Any other actions (for example, Apply Transform or Send to Gateway) should be after the Approval step.
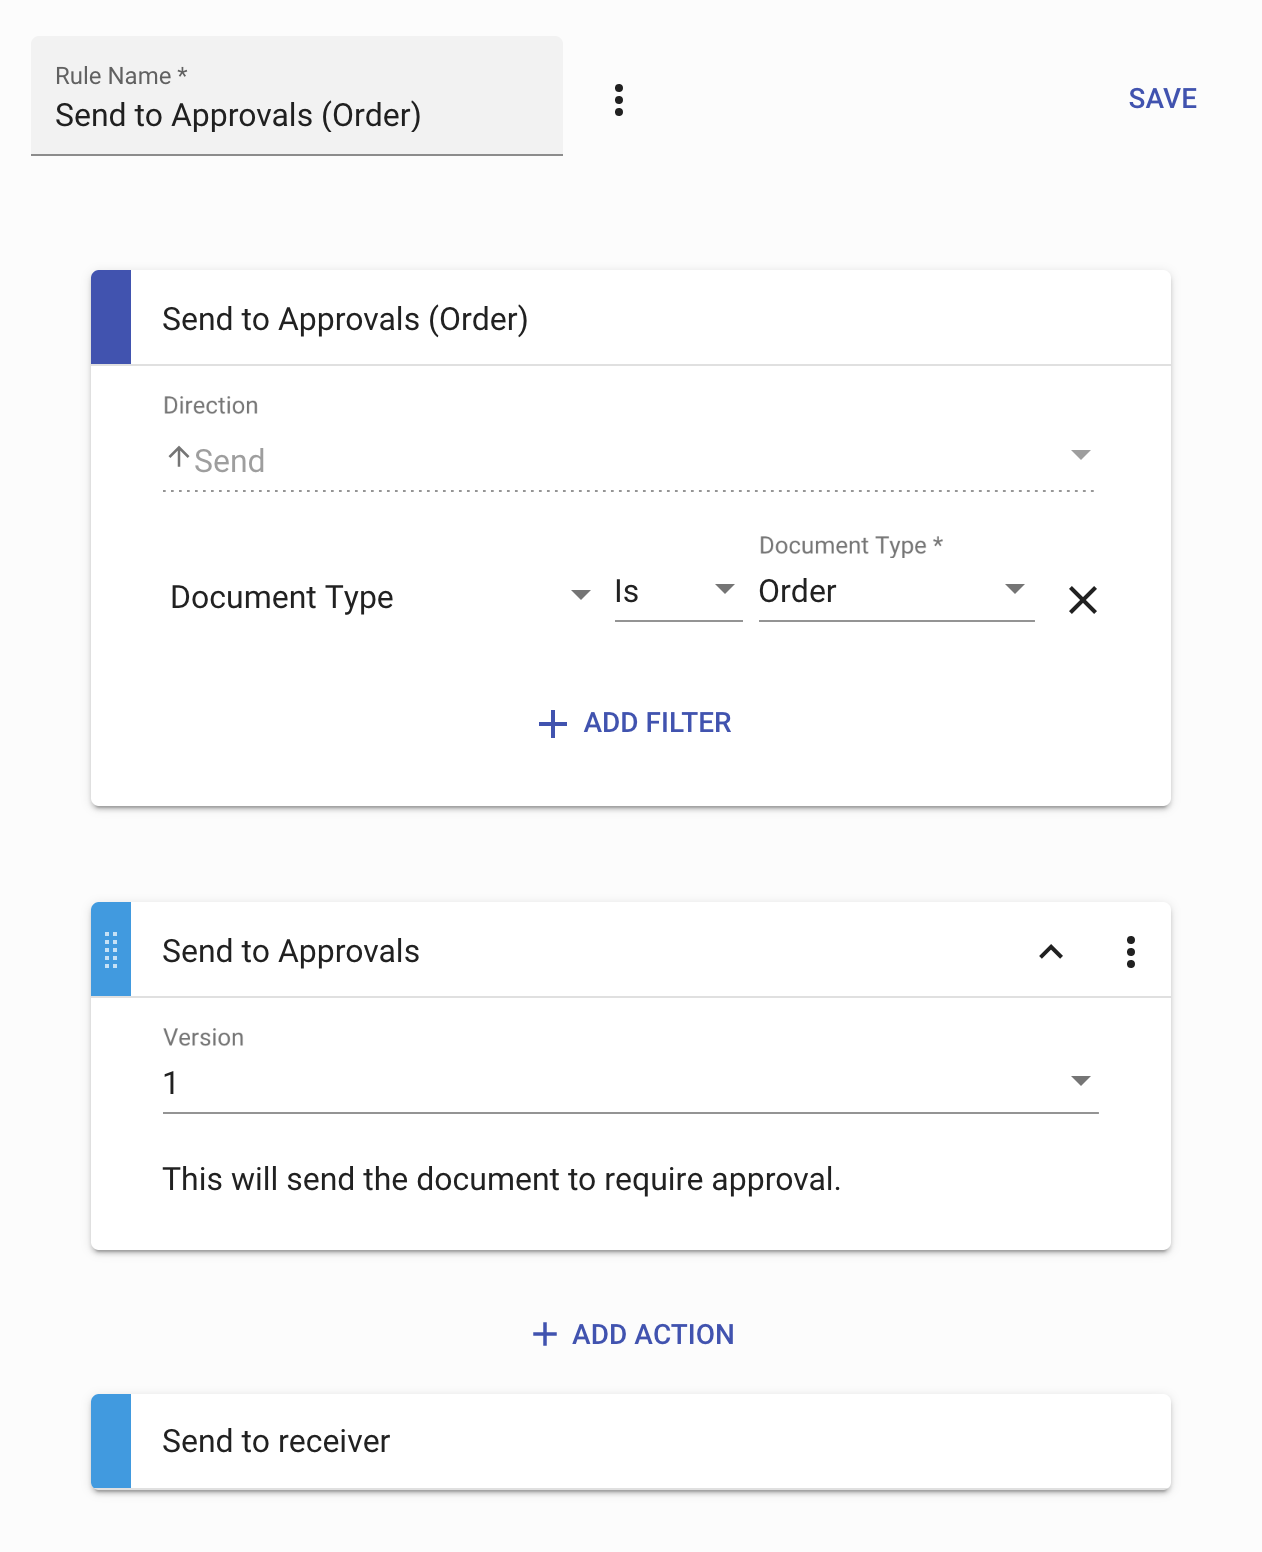
For orders, the direction should be Send and a filter should be added for Document Type: Order.
WARNING
The order of the actions determine how a Document is processed in (and out from) DX2. This is important as the Send to Approvals action only supports UBL Documents. If you transform the Document before Approvals, then you will not be able to see the Document's preview.
# Scenario to set up
For security groups and users, there are four primary roles you need to set up.
- Default Approval Group or the AP Clerks - This is the group that will be first assigned the Approval Document to code. They can reassign the Document to other people for coding.
- Approvers - These are the approvers of your invoices and orders.
- Final Approvers - The final approvers are the same as the approvers, but have no approval limit.
- Rejection Manager - The rejection managers will handle Documents that are rejected. They can then recode or discard the Document.
In this scenario, we will set up the following:
| Name | Role | Description |
|---|---|---|
| Jed | CFO | Responsible for any approvals escalation relating to Operational Expenses, and is involved in Capital Expenses approvals. |
| Elly | AP Clerk | Has fixed requirements for maintaining and refilling office supplies, and also does coding for AP. |
| Jethro | Ellerslie Branch Manager (Approver with $200 limit) | Has hands-on responsibilities, and try to keep workers working as efficiently as possible. Responsible for day-to-day requisition/invoice approvals. |
| Sophia | Auckland Manager (Approver with $1000 limit) | Overall manager for all Auckland branches who approves larger expenses for the company. |
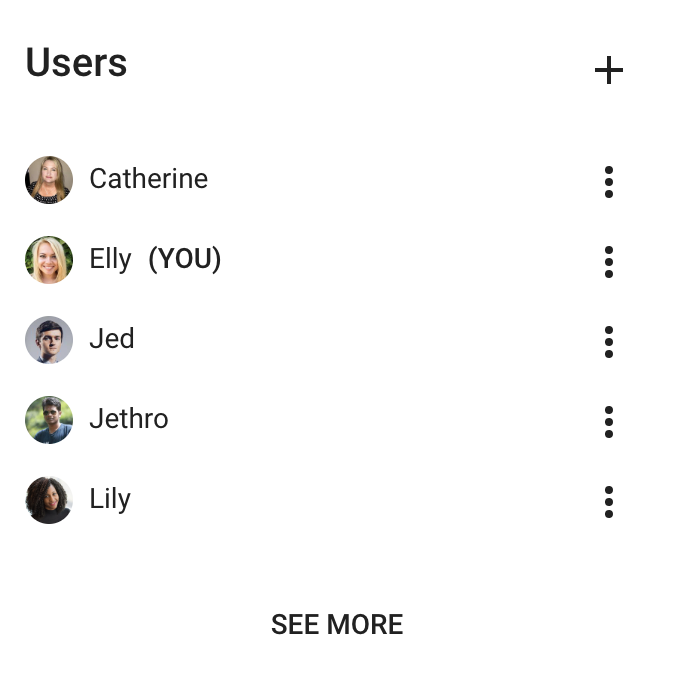
# Set up Users
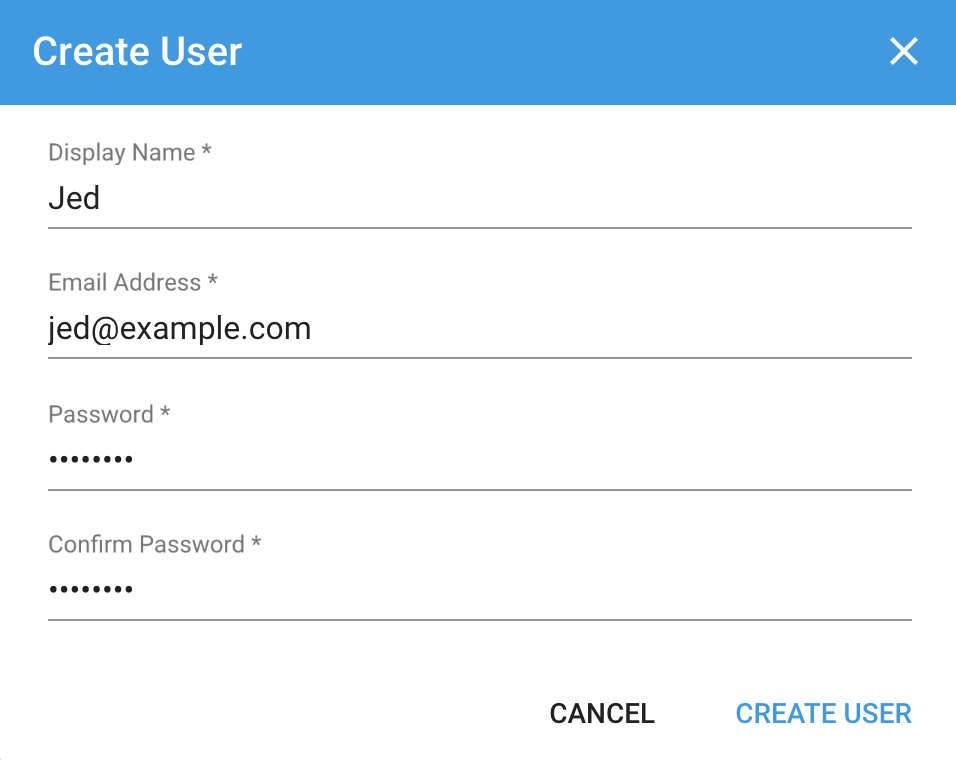
Firstly, we need to create the users. Go to the My Company page on the sidebar. Under the Users card, click the Add User button.
Add in their name, email address and a password.
TIP
It is recommended that the users change their passwords after they log in for security reasons. Go to the User Settings page to do so.
Repeat for all users in your system.
# Set up Security Groups
To set up security groups, start by going to the Security Groups page on the sidebar. Then click on Create.
We will start with the approver groups. Each different approver group needs a security group. For example, Jethro, who we want to only have a $200 limit, must be in a separate group than Sophia who has a limit of $1,000.
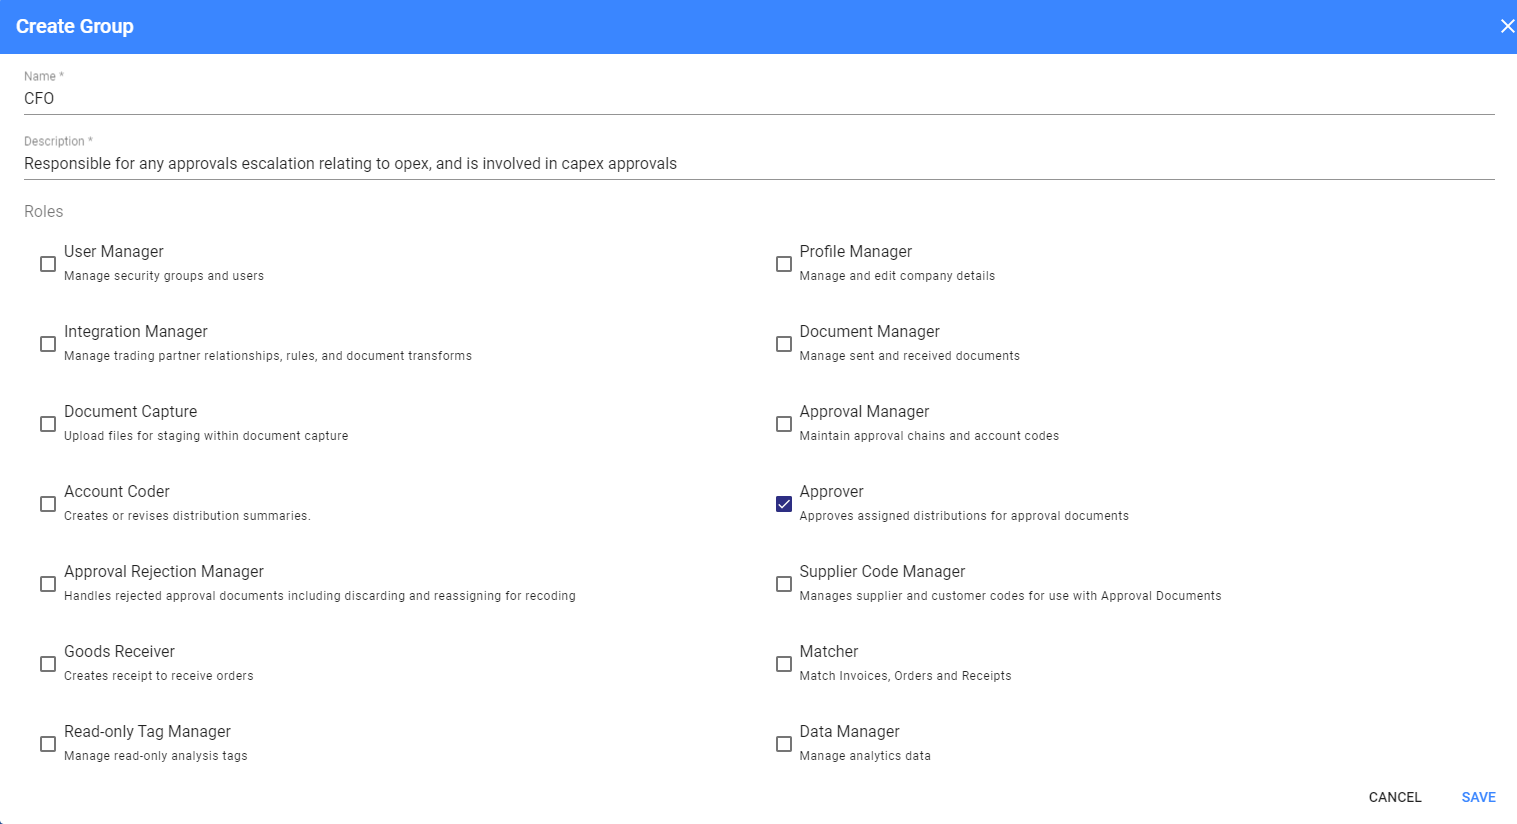
For an approver, we only need to provide a name, description and to tick the Approver role.
In this scenario, we will set up the CFO, Ellerslie Branch Manager, and Auckland Manager as approvers.
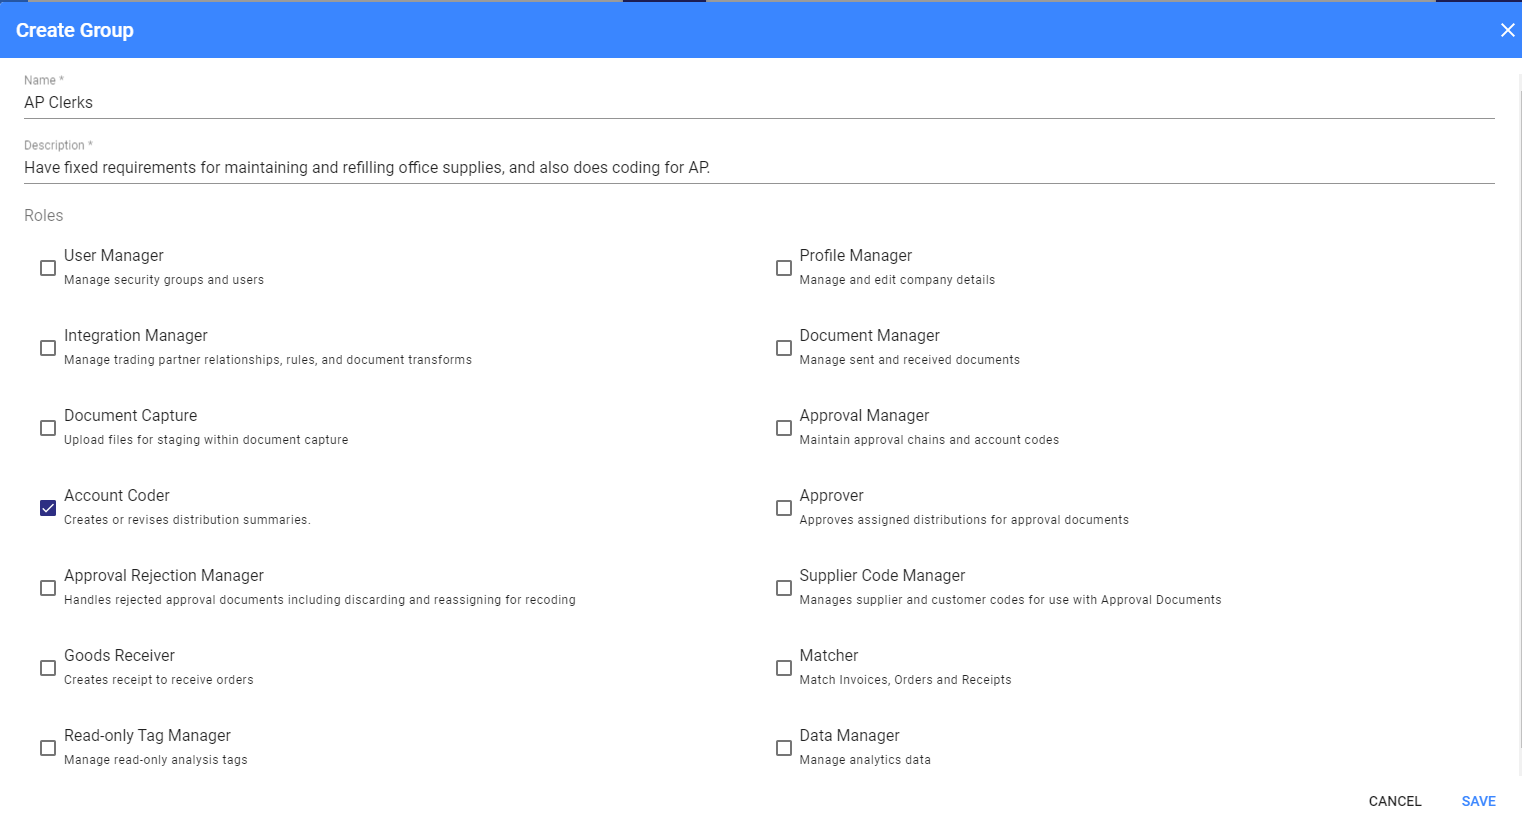
Set up the AP Clerk group in a similar fashion. In addition to the Approver role, they also need the Account Coder role.
TIP
The Account Coder role allows a group to create and edit distributions. The Approver role allows the group to be in an approval chain (so they can approve or reject Documents).
# Additional roles
To access the Administration page, you will need the Approval Manager and Supplier Code Manager roles. In this scenario, we will leave the Administrator as the only one that can administrate Approvals.
We will give the CFO the Approval Rejection Manager role, so they will be allowed to handle rejected Documents.
TIP
If you need to give additional roles to a security group, click on the triple-dot menu and then Edit.
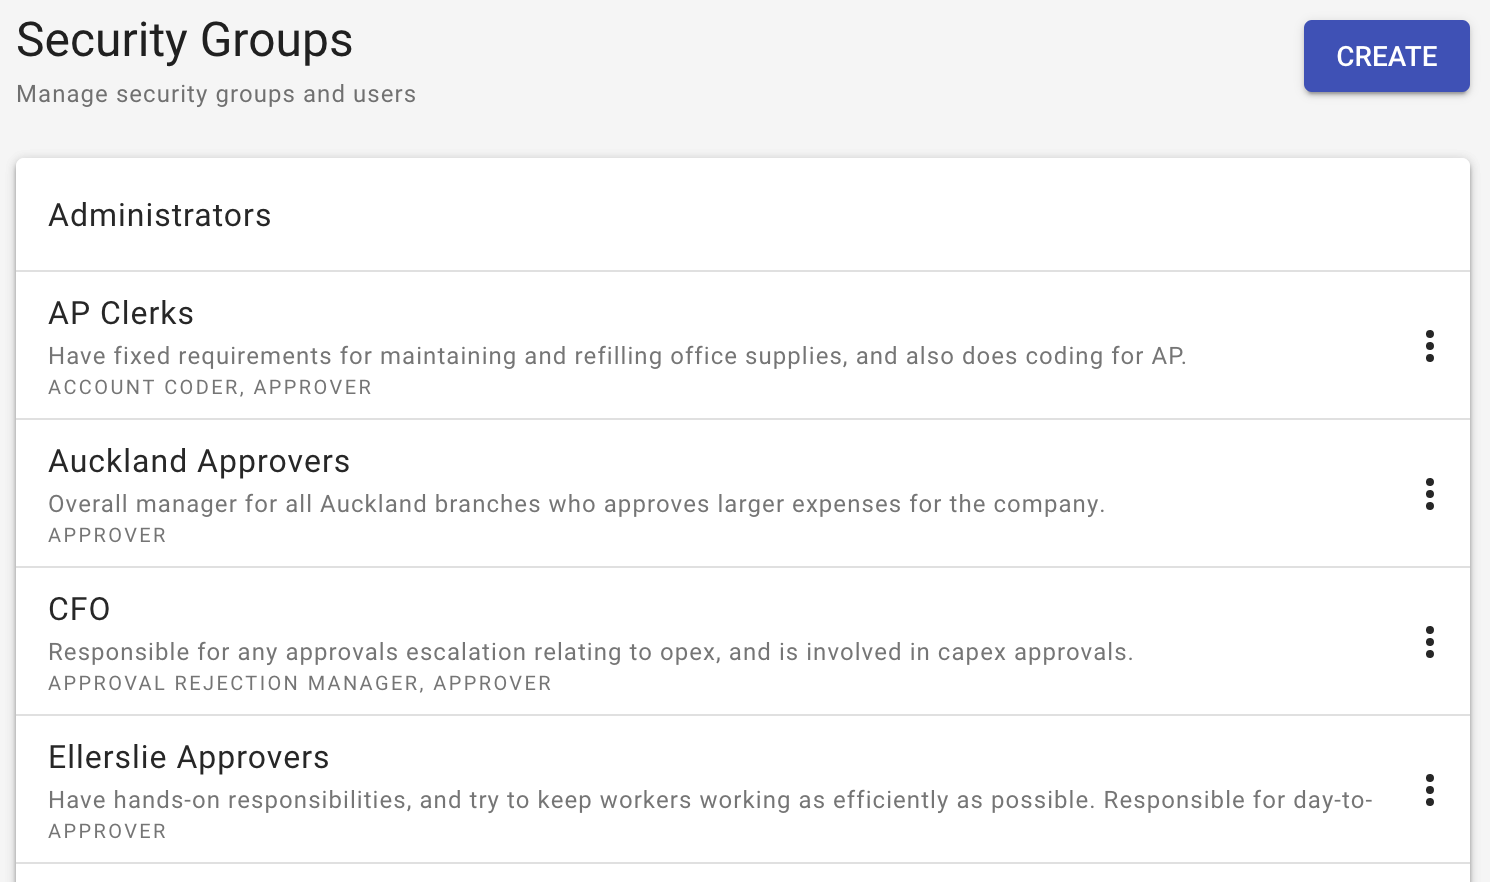
# Resulting Security Group Structure
Following the above, we have now set up the building blocks for the default approval group, and approval chains.
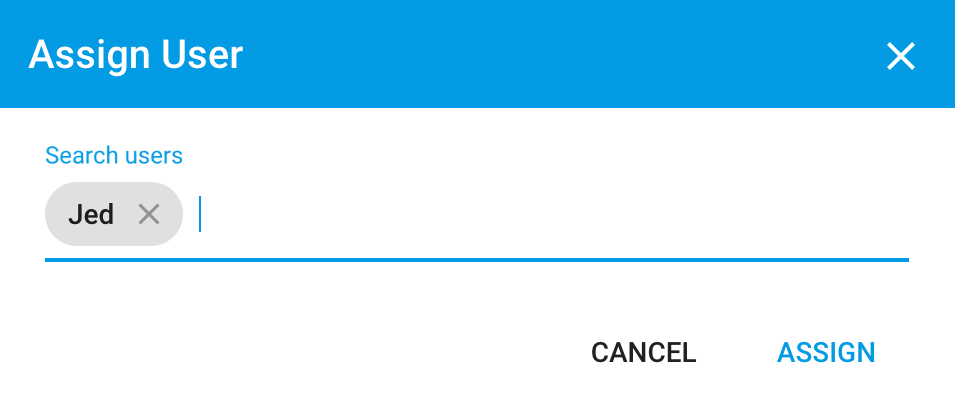
Assign users to each security group, by clicking on the security group, then Assign User.

Type in the user's name, pick them and click Assign. You can assign multiple users at the same time which saves a lot of time when setting up many groups and users.
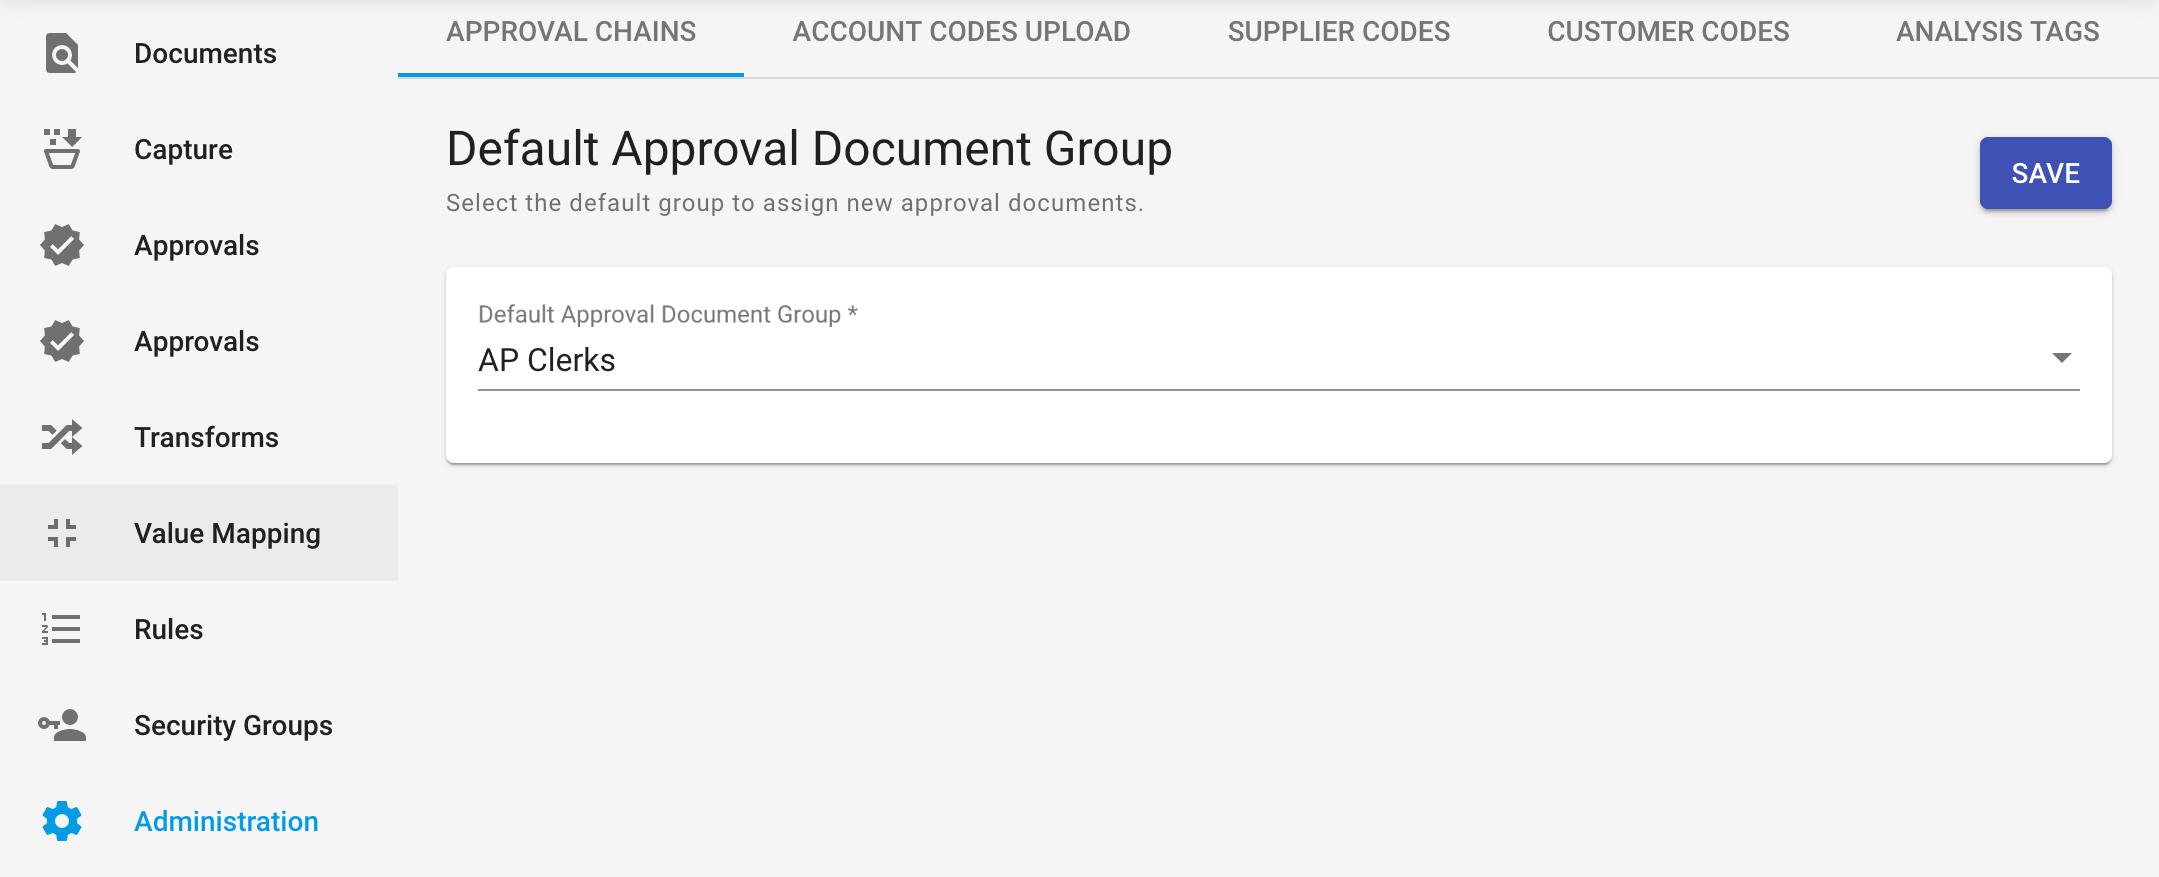
# Set up the Default Approval Group
The default approval group is the security group which will receive all incoming Documents to be approved. They then can code the Document and send it for approval or reassign it to another group to do so.
On the Administration page, under the Approval Chains tab, set the Default Approval Document Group to the AP Clerks created earlier and click Save.
# Set up Approval Chains
On the same page as the default approval group, we have the approval chains. Click Create to get started.

The approval chain comprises of four parts:
- Name
- Rejection Manager
- Conditions (Account Code Mask, Analysis Tag, Supplier Code)
- Approval Chain Groups
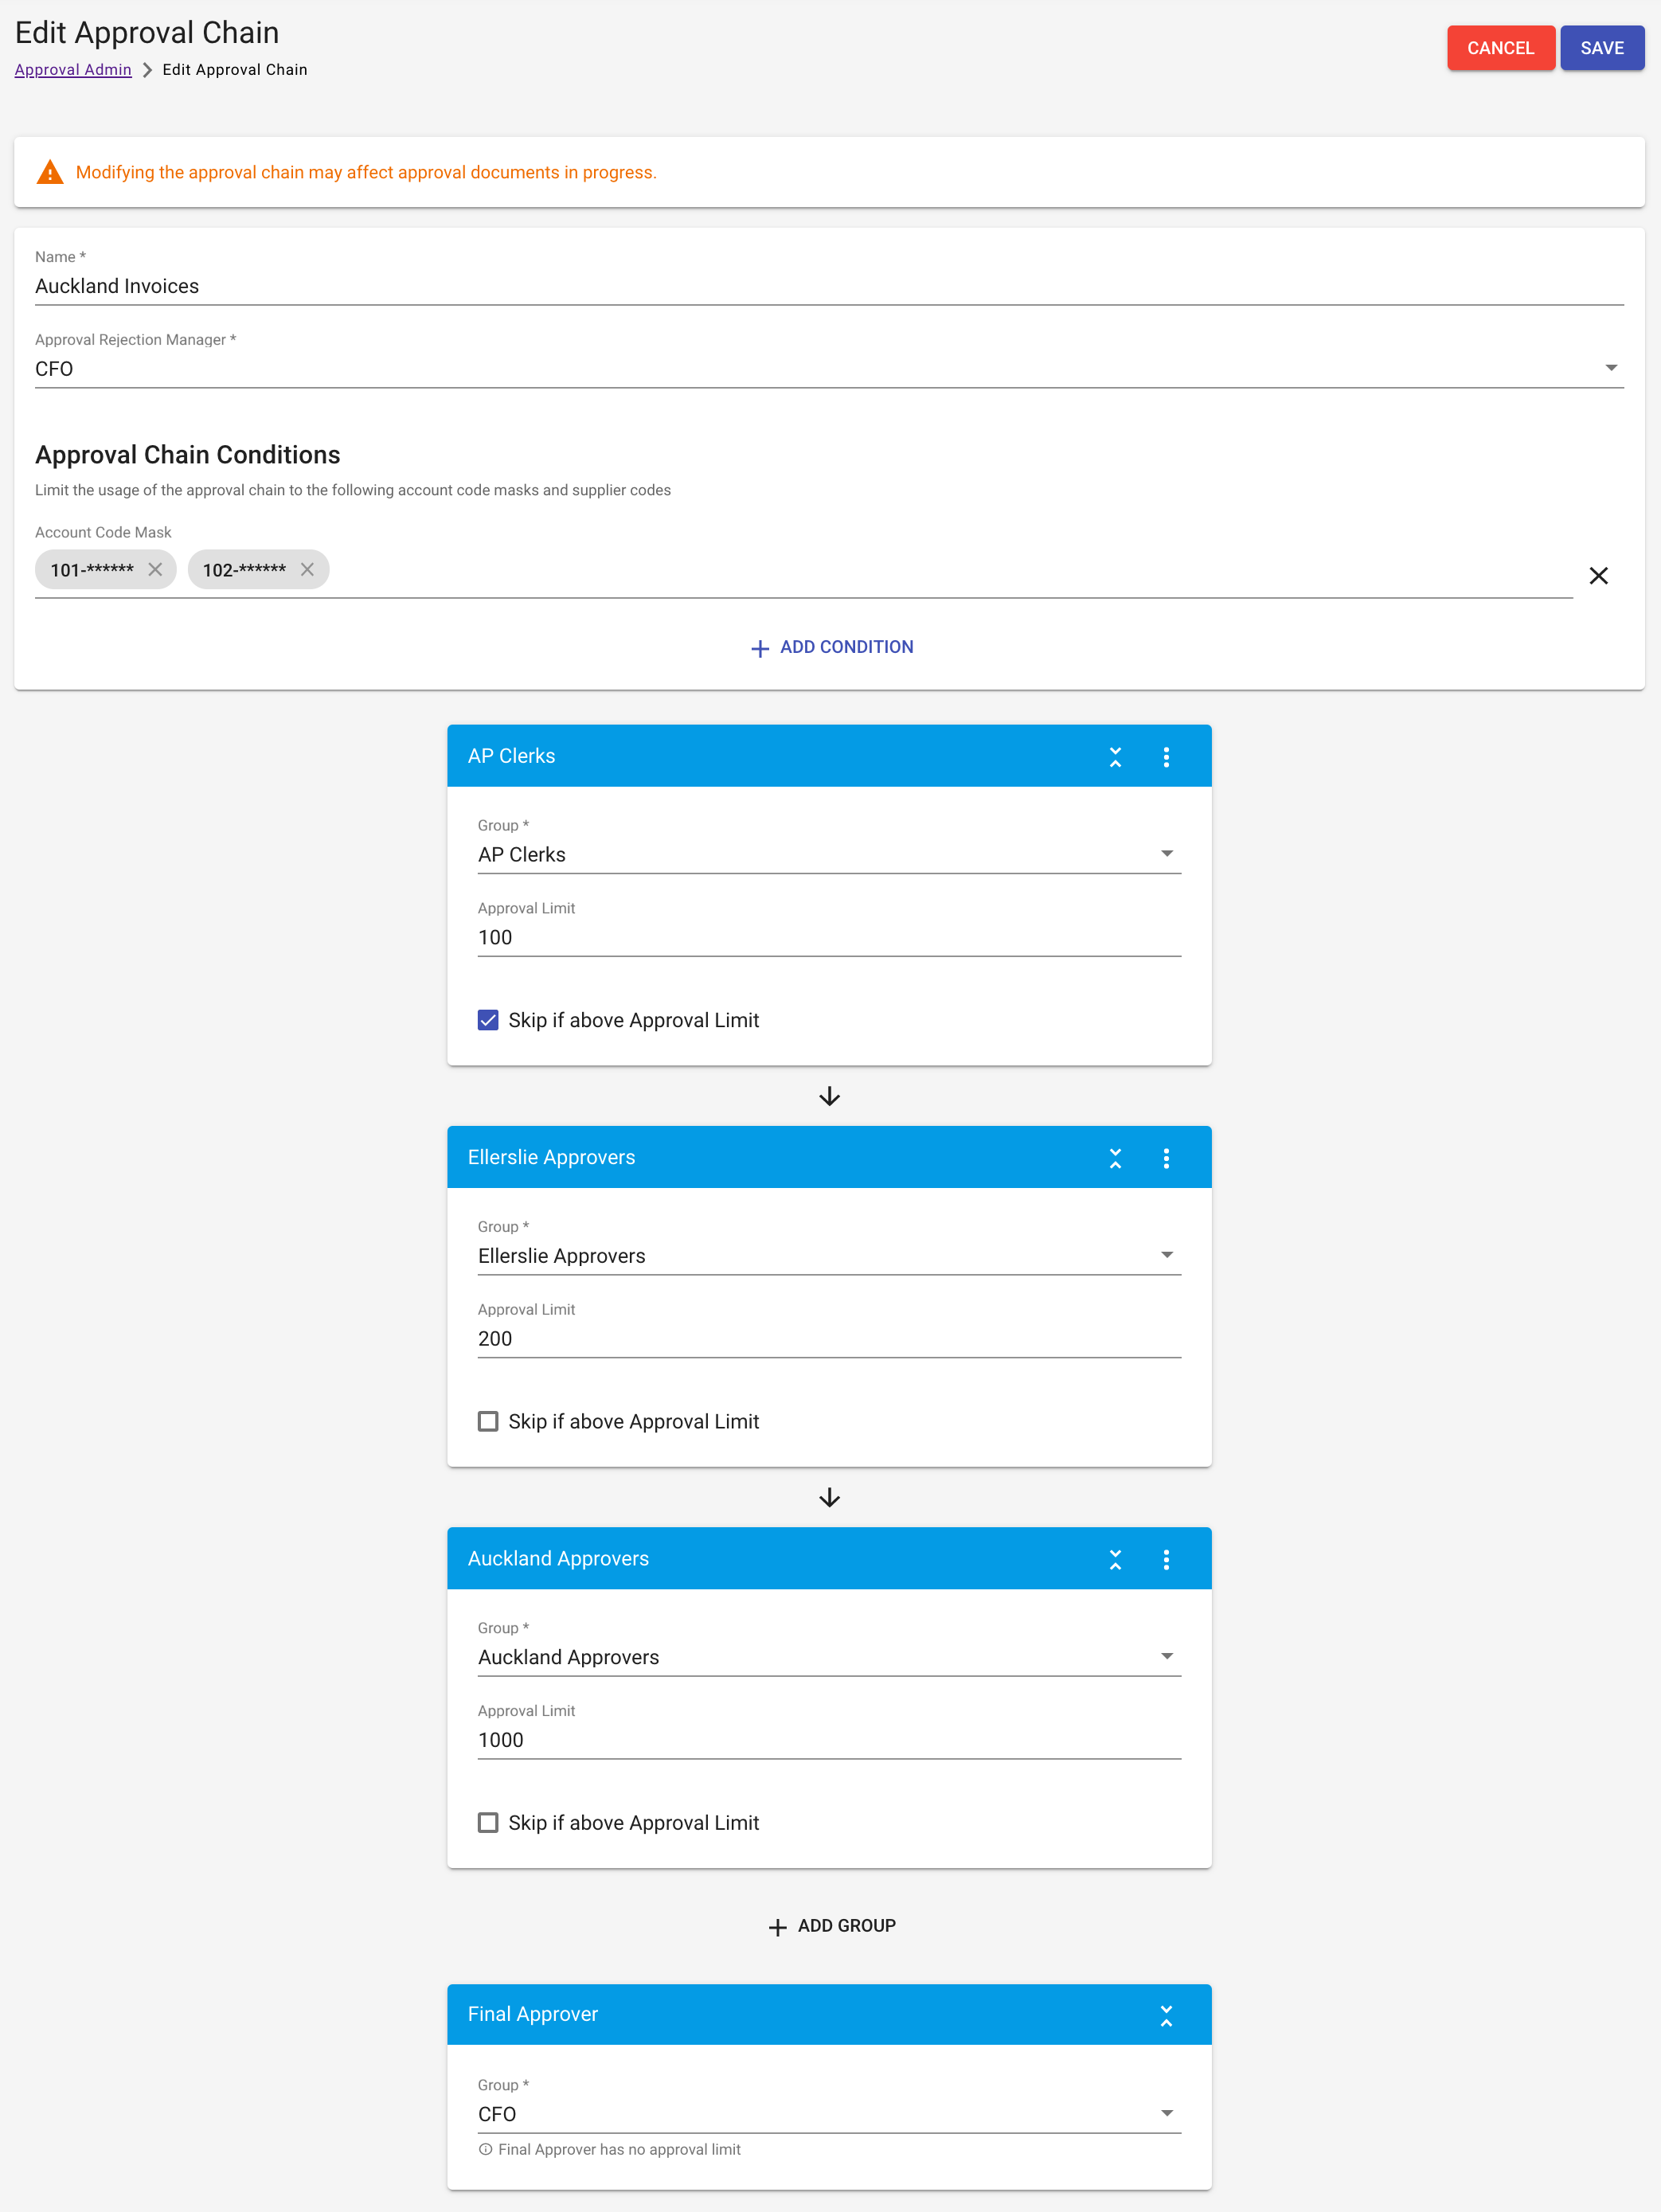
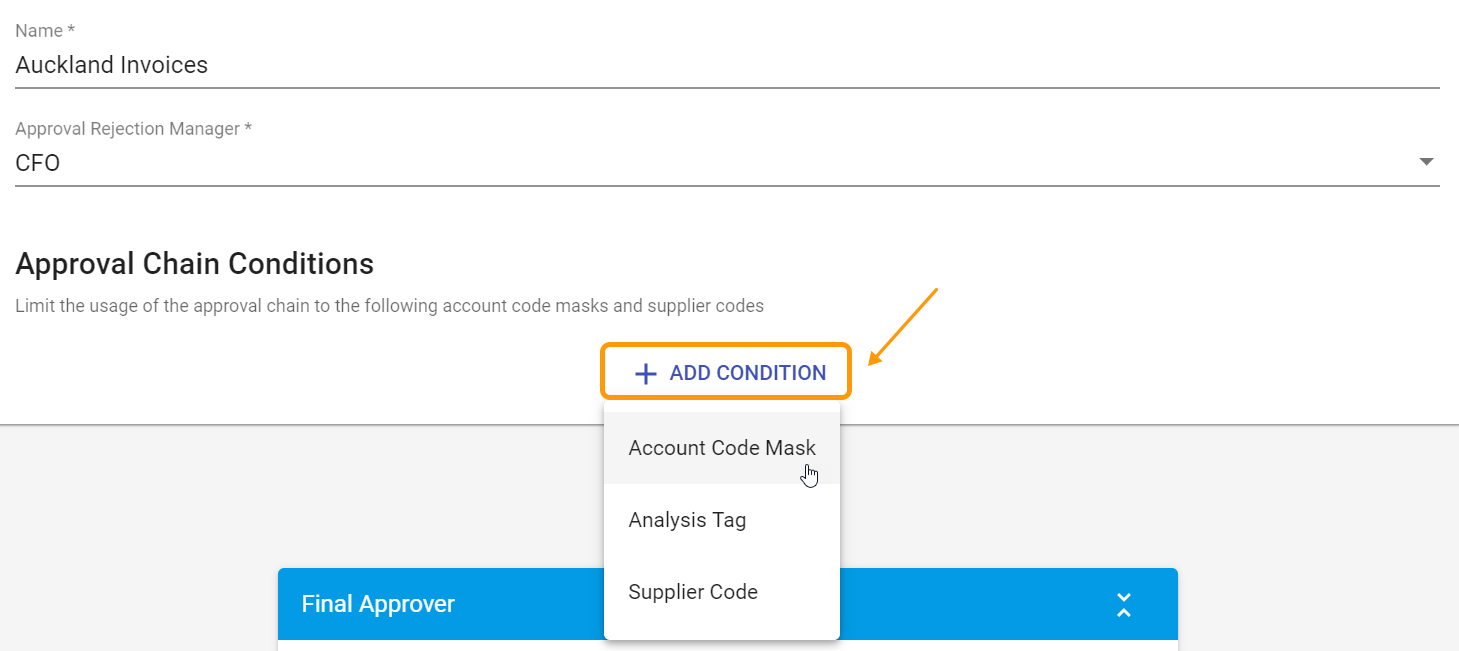
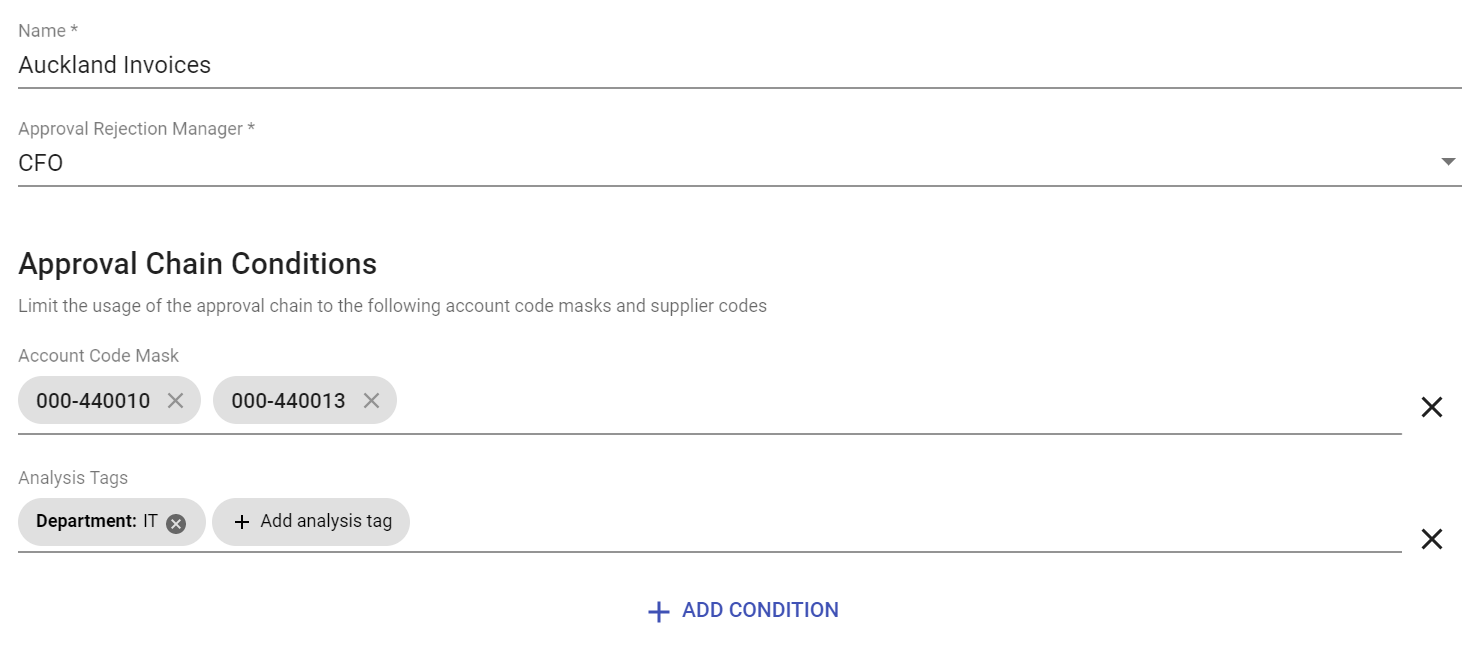
The following is an approval chain set up for invoices in Auckland.
# Name
The name of the approval chain. This is used by the AP Clerks in the distribution card below.
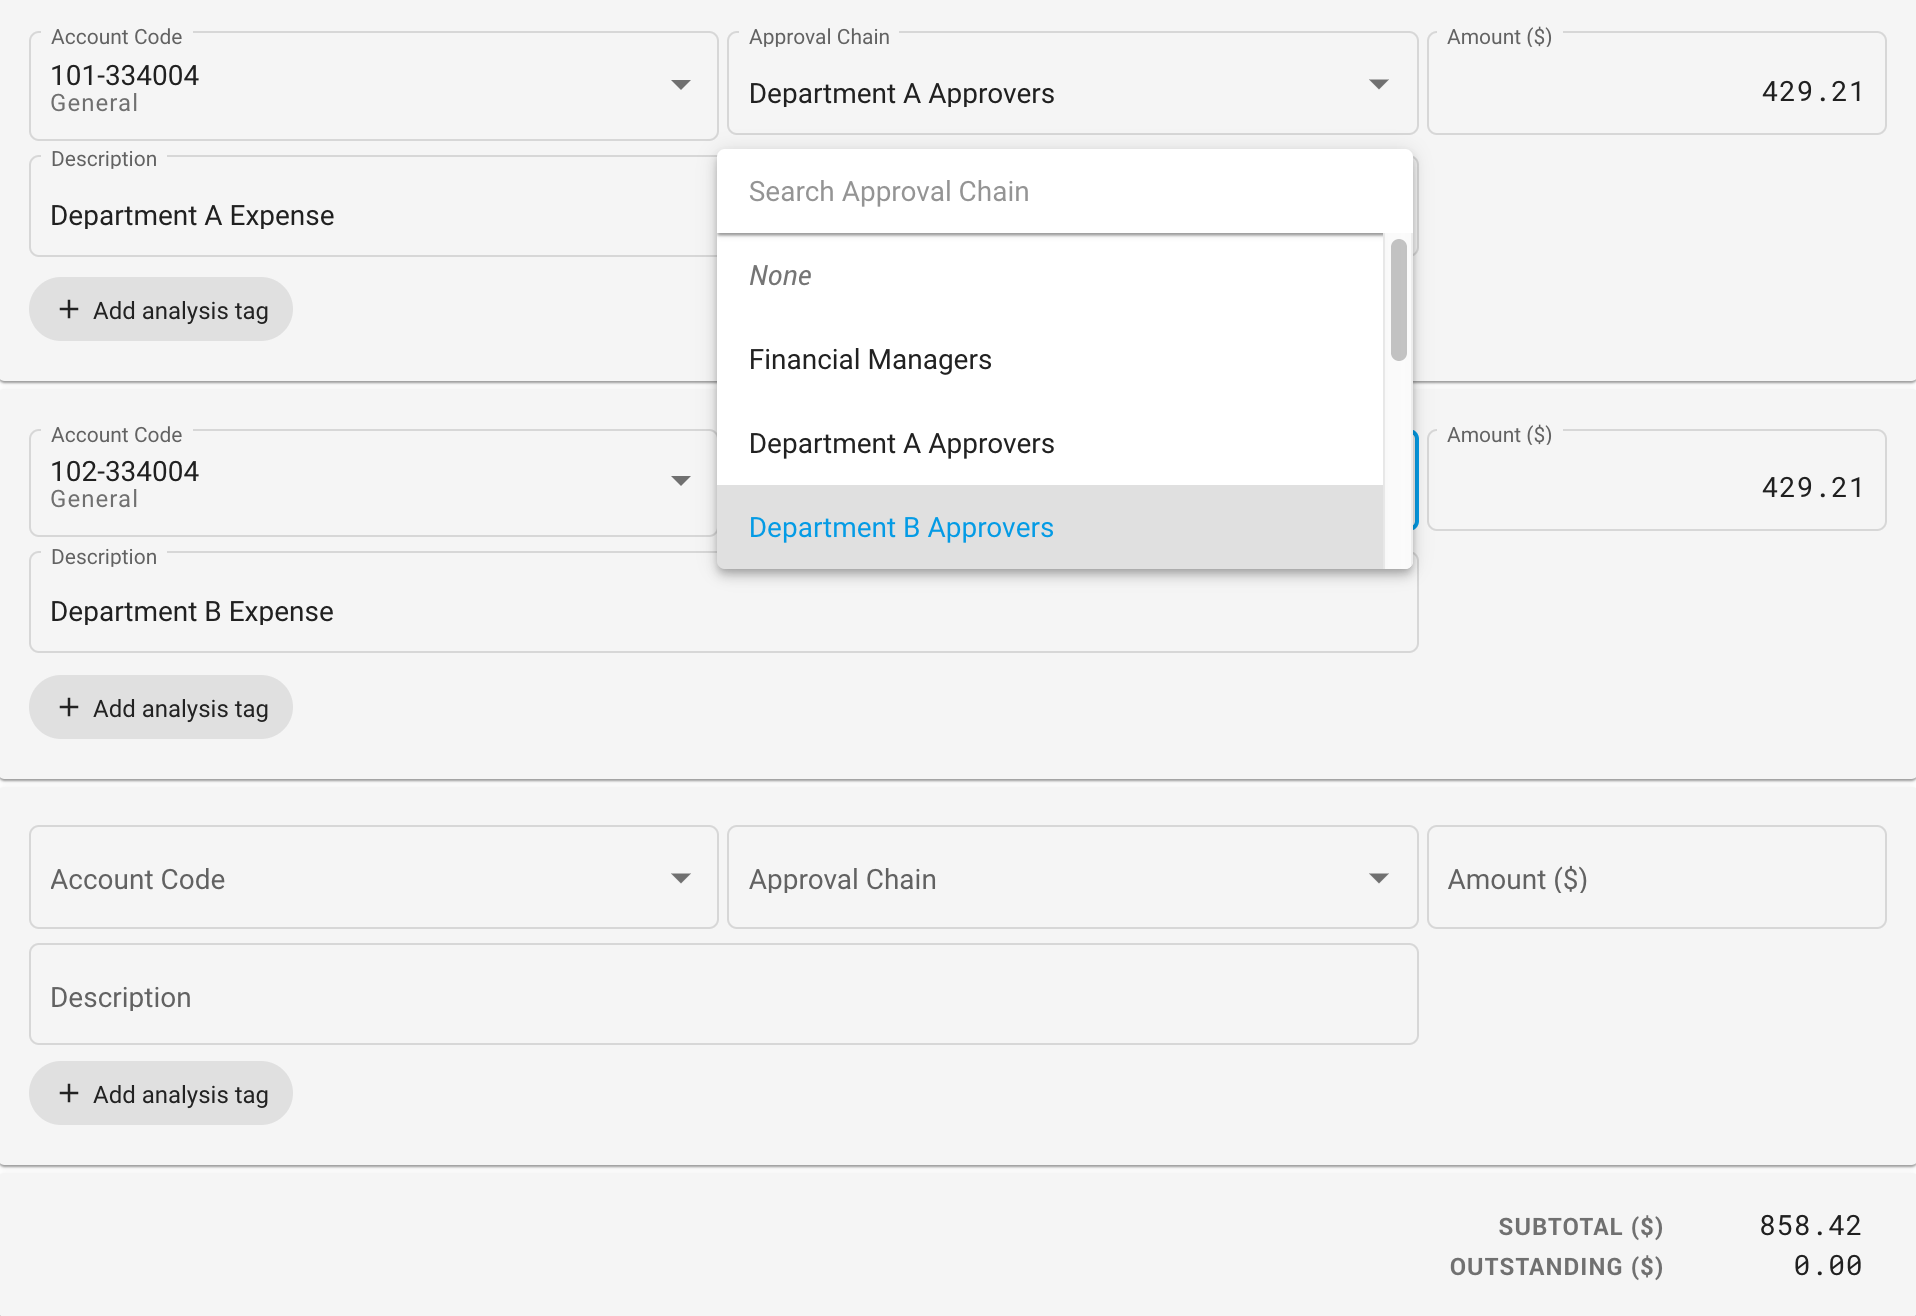
TIP
Pick a descriptive name that the AP Clerks will recognise at first glance. This is important as they will only see the name of the approval chain when using it.
# Rejection Manager
This is the group that handles all rejections if a person in the chain has rejected the Document. Typically, organisations set it to the same group as the Default Approval Group so they can recode or discard the Document. Simply select a group to handle the rejections.
TIP
Note that the security group you pick must have the Approval Rejection Manager role (see Set up Security Groups above).
# Conditions
An approval chain may only have rights to handle certain account codes, analysis tags or a supplier code. The approval chain configuration allows these conditions to be made per approval chain.
To add a condition, use the Add Condition button on the approval chain card.
# Account Code Mask Conditions
The account code mask condition adds a restriction so that only certain account codes can be used. In the example below, the Auckland Invoices chain is only allowed to be assigned to distributions that match the mask 101-****** and 102-******.
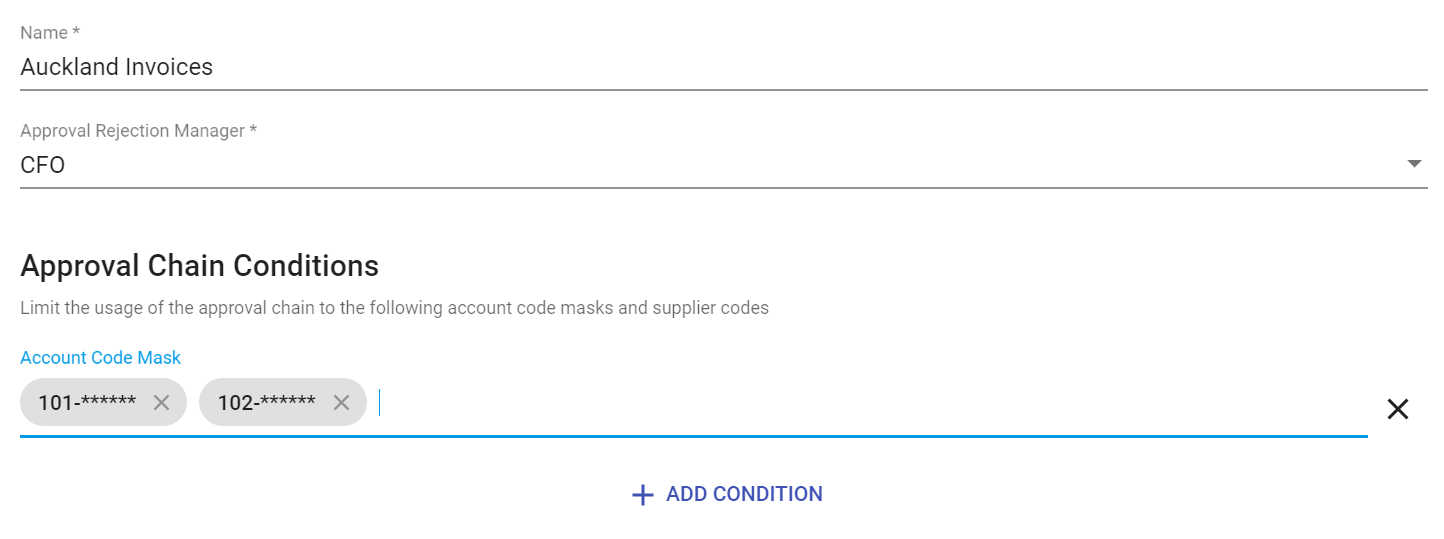
TIP
* is a placeholder character. The system will interpret * as any character.
For example, for the mask 101-******, it will accept: 101-123456, 101-444112, etc...
Note that we only support up to 32 masks per approval chain. Make good use of placeholders to reduce the amount of masks that need to be entered.
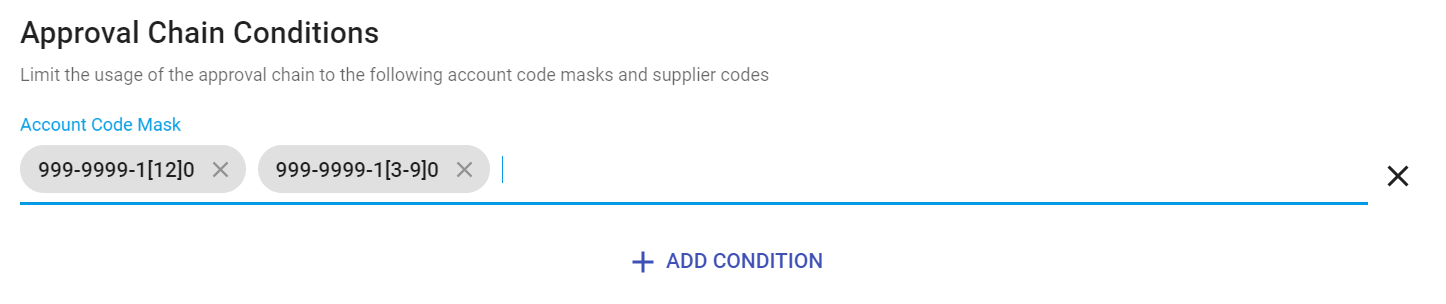
# Advanced Account Code Masks
In addition to the placeholder character, the use of character sets are available for account code masks. This allows for advanced rules if you have a more complex account code structure.
A common example is like the one below:
999-9999-1[12]0 means that the account code's second to last character must be either 1 or 2.
999-9999-1[3-9]0 means that the account code's second to last character must be between 3 and 9 inclusive.
# Analysis Tag Conditions
Conditions can be set up based on Analysis Tags setup as required on account codes. These conditions will help restrict and filter the approval chains that can be used in approval distribution.
TIP
If an account code mask is set up, only the intersect of required Analysis Tags from the account code mask can be used as part of the condition.
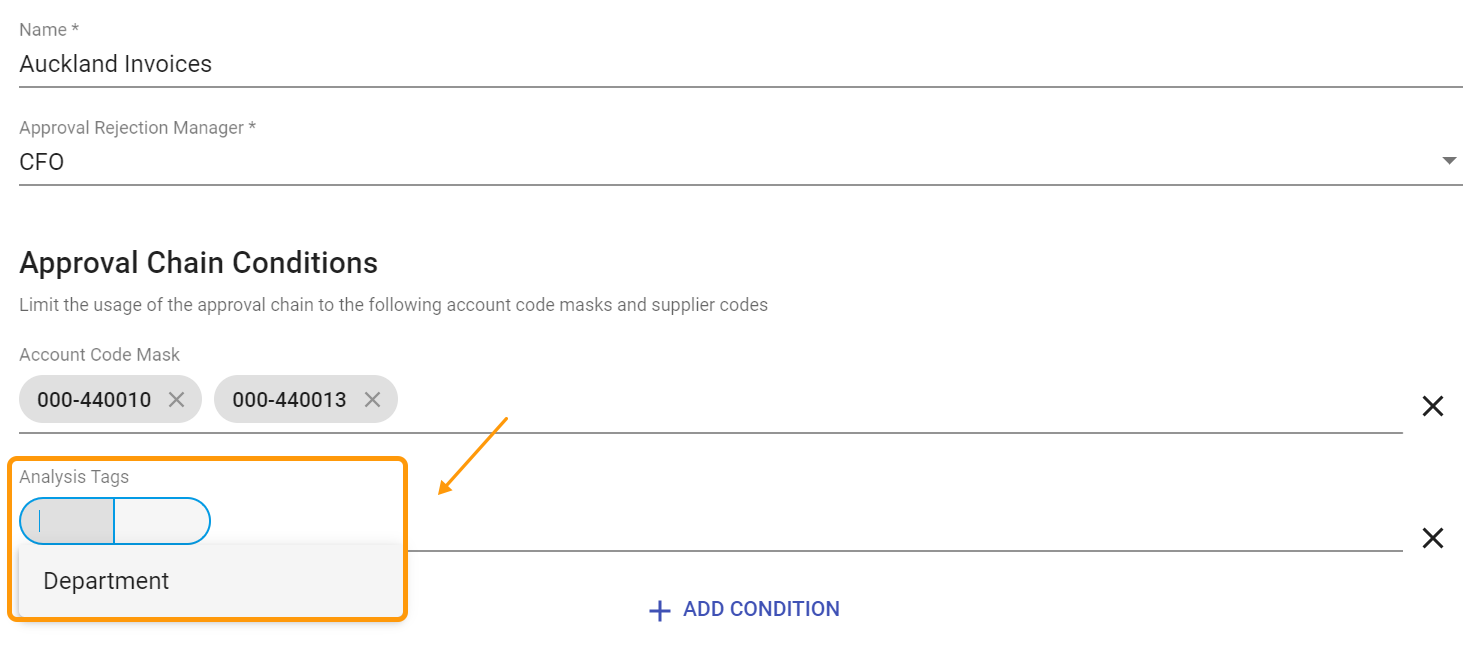
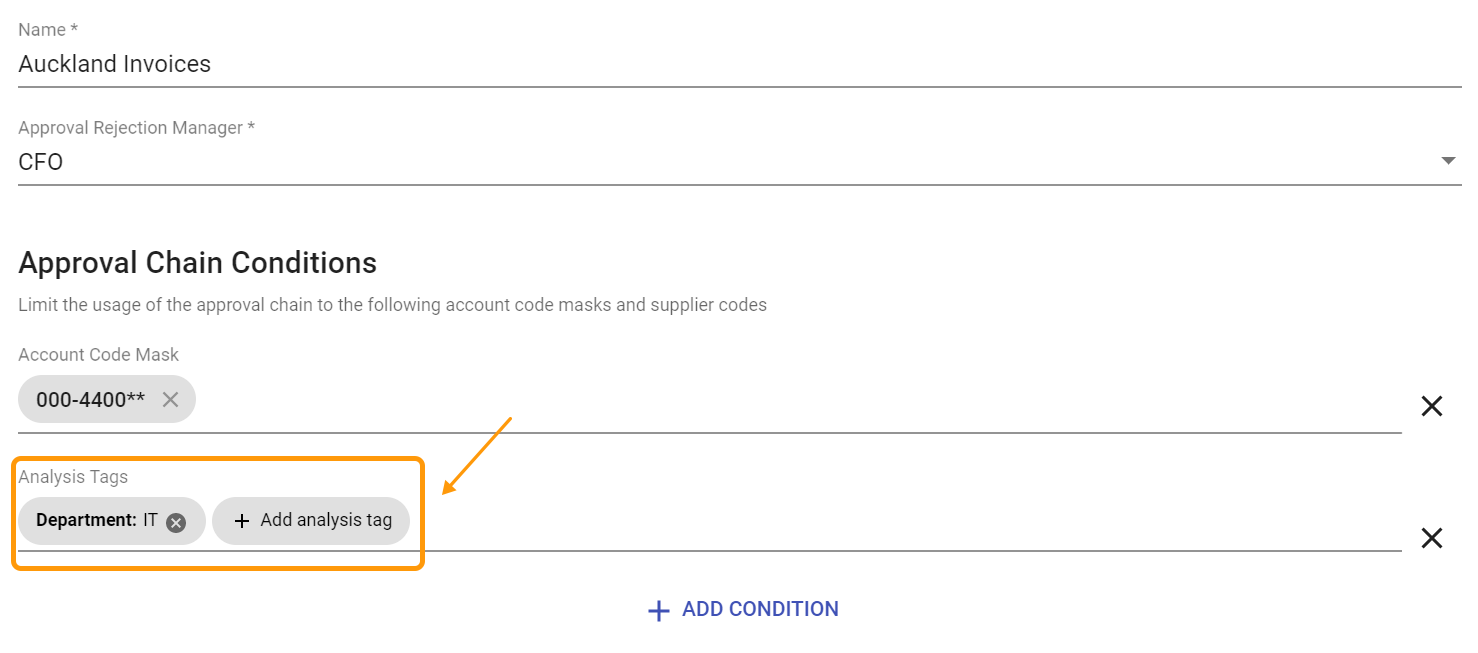
# Account Code mask where specific Account Codes are listed
In this example, the account code condition has been set up with two specific account codes. One account code has been set up with Department, Employee and Client Analysis Tags. Out of the three Analysis Tags, only Department is required and the other two are suggested. The second account is set up with Department and Client Analysis Tags, both are set up as required.
With the above setup we will only see the Department analysis tag in the list as it is the only analysis tag which is required on both the accounts codes.
# Account Code mask using special characters
In this example, an account code condition has been set up with a mask. We have taken the example of the same account codes but have used a mask to set up the condition. In this scenario our account code mask will only include the two accounts from our example.
With this setup, when an Analysis Tag condition is set up, we will see only the Department Analysis Tag in the list.
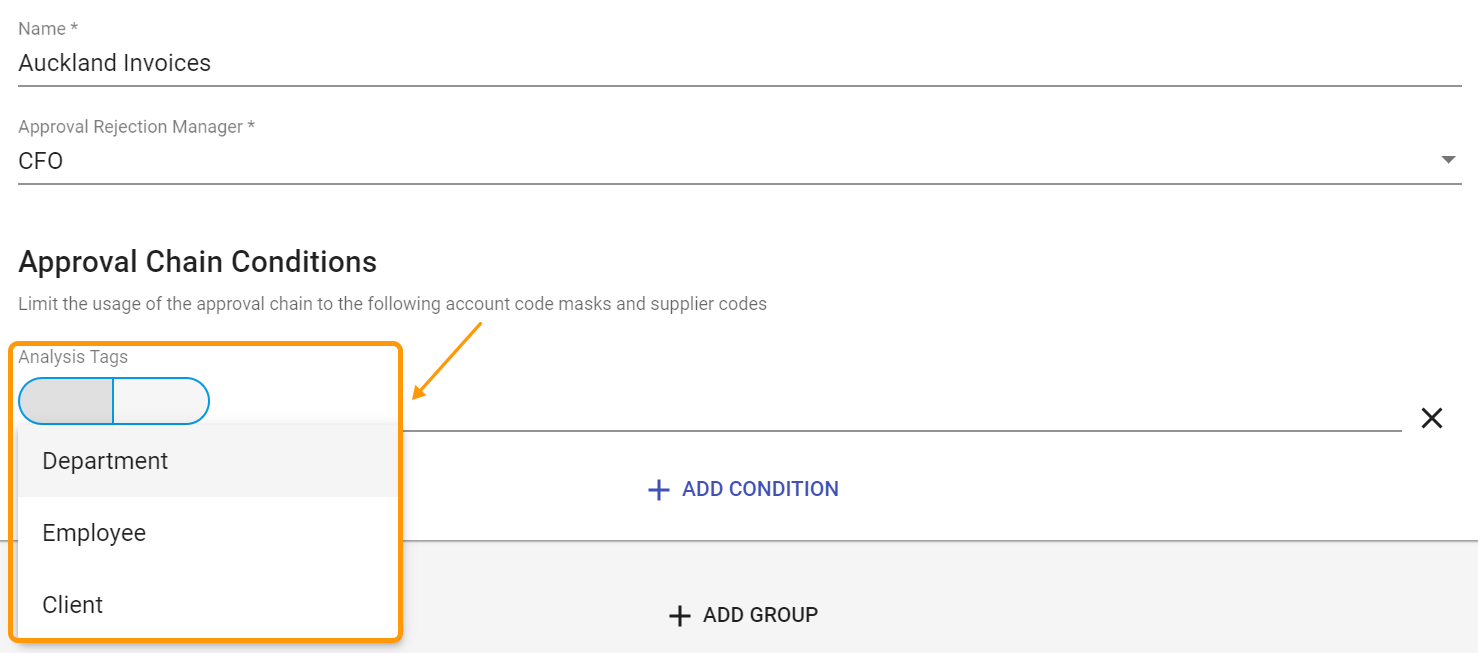
# No Account Code condition and with Analysis Tag condition
In this example we are not using an account code mask condition. Here, when an Analysis Tag condition is set up only, we will see all the required Analysis Tags across all the accounts.
# Supplier Code
The supplier code condition adds a restriction so that only certain supplier codes can be used with the particular Approval Chain.
For example, you might have a dedicated approval work-flow for stationery purchases. For this, you can add the restriction that the "Stationery Approval Chain" can only be used with the supplier WAREHOUSESTATIONERY.
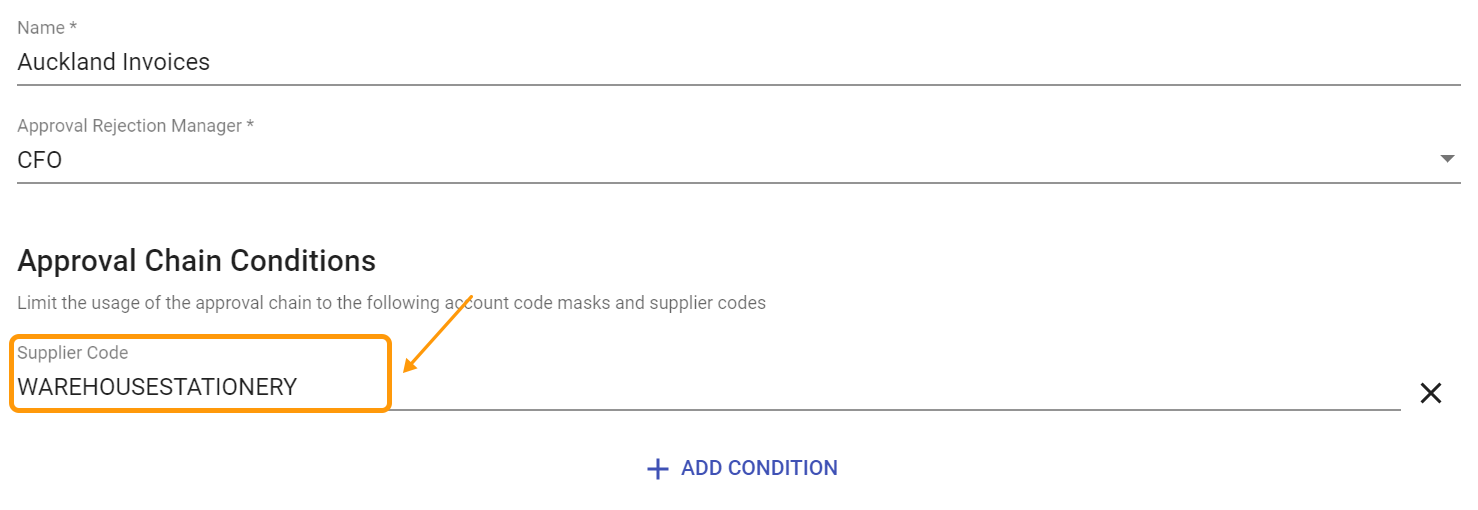
Please note that only one supplier code can be used per Approval Chain.
# Approval Chain Groups
The main part of the Approval Chain is the order in which you define the sequence of security groups. The order of the groups in the list represent the approval work-flow.
In the below scenario, it shows four groups, each with different approval limits.
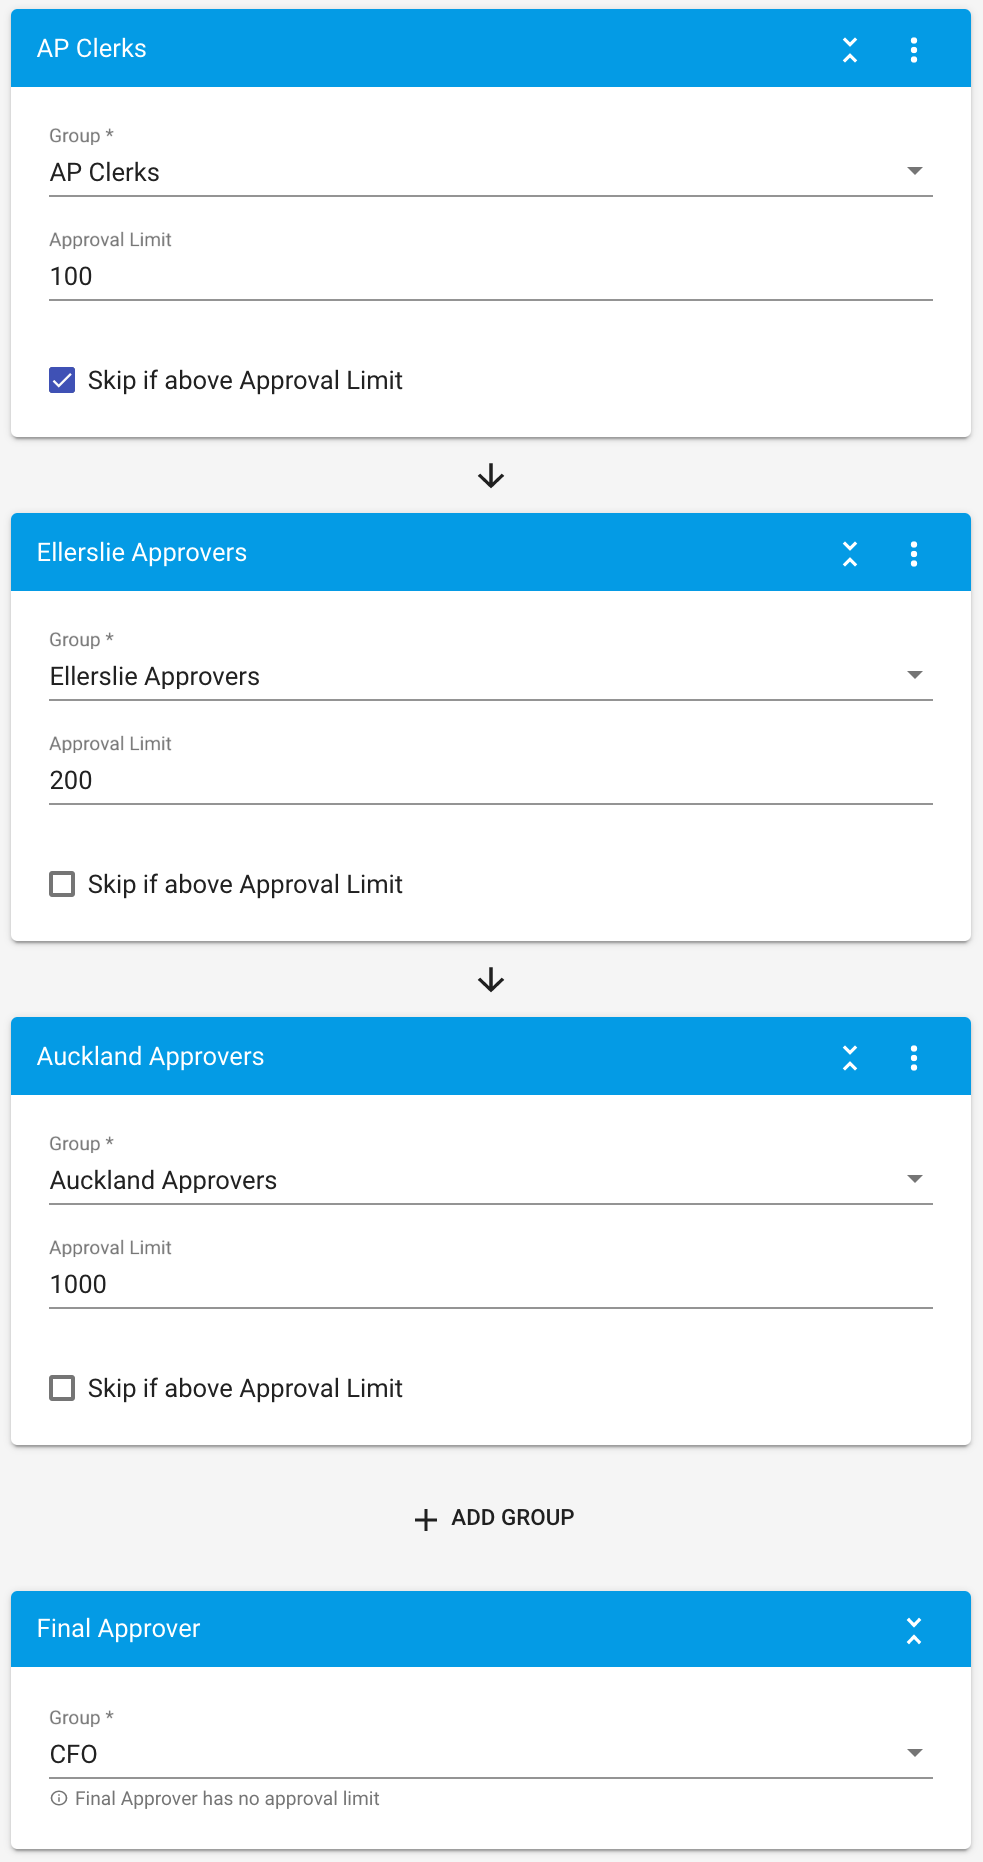
To add a group, use the Add Group button. Then select a group and add an approval limit. The approval limit is inclusive of the amount entered.
TIP
If you want an approver to always check a Document but not actually let a Document complete, simply give them a limit of $0.
Repeat this process until you have the approval chain desired. You can move groups up and down the list by clicking on the triple-dot menu on the group, then Move Up and Move Down respectively.
# Example on how the Approval Chain works
If a user approves the Document, the user's group is checked for their approval limit. When a user has the authority to complete an approval, the chain stops. For example, if the approval chain needs to approve $1,000:
- The AP Clerks are skipped since the amount is over their limit of $100.
- Ellerslie Approvers need to approve the distributions.
- Auckland Approvers need to approve the distributions. When they approve, the approval for the distributions involved is complete.
- The CFO is skipped, since Auckland Approvers already have the authority to complete the approval.
# Skip if above Approval Limit
The Skip if above Approval Limit checkbox, simply skips the security group if the total to approve exceeds their limit. For example, in the scenario above, the AP Clerks are to be skipped when it's over $100.
TIP
If your coders are allowed to approve Documents up to a certain limit, Skip if above Approval Limit is a useful option so they don't need to pre-approve again.
# Final Approver
The final approver is simply a group that has no approval limit and must be last on the list of groups. All approval chains must have a final approver.
# Set up Account Codes
For Approvals to work with your financial system, DX2 requires the correct account codes. Accounts codes can be uploaded in bulk or set up manually from the Account Codes tab using the Create button under Administration.
# Bulk upload of account codes
The bulk upload can be achieved by exporting the account codes from your financial system into a CSV file. Then you can upload the CSV file to DX2's Account Codes Upload tab.
You may need to adjust the format of the CSV file to fit the below schema.
| AccountCode | AccountDescription | Active | AccountCodeType | RequiredAnalysisTags | SuggestedAnalysisTags | CodingAnalysisTags |
|---|---|---|---|---|---|---|
| 32-21-15-ABC | General Expense | 1 | 0 | Department;Project; | Employee; | Status |
TIP
You can use a SQL script to extract this CSV file from your financial system. Remove accounts that are not expense accounts and not required for Approvals. Add any other required accounts in before uploading the file.
Contact your Olympic representative if you need help with this. This process requires manual integration work and is dependent on the financial system you use and your organisation's setup.
# Active Column
The active column determines whether the account code is allowed to be used on DX2. This is commonly used to disable old account codes.
- Use
0if you want to disable the account code - Use
1if you want to be able to use the account code in DX2 Approvals
# Account Code Type Column
The account code type determines whether the account code is related to a currency (posting) amount or a unit account. In most cases, the account code should be a currency type.
The currency type account codes must add up to the subtotal of the Document, whereas the unit accounts are not validated.
- Use
0if the account code is a currency (posting) account type - Use
1if the account code is a unit type (e.g. kg)
# Required Analysis Tags Column
Analysis tags can be set up as Required for an account code if a value must be provided on the distribution line.
A document cannot be fully approved unless a value is provided for the required analysis tags on the relevant distribution line(s). This check is performed separately for each approval chain the document is assigned to.
TIP
It is possible to confirm coding without providing a value for the Required Analysis Tags for the accounts on a distribution line(s). These values have to be provided before the document goes through final approval for the approval chain assigned to that distribution line.
# Suggested Analysis Tags Column
Analysis tags can be set up as Suggested for an account code if it is often useful to provide that information, but not mandatory. Analysis tags set up as Suggested will show up on the distribution lines when that account is chosen but they can be removed if needed.
Providing a value for a Suggested Analysis Tag is not a must to fully approve a document.
TIP
If the Analysis Tag entered in the upload file does not exist in the DX2 portal, it will be created as an Autocomplete type of Analysis Tag.
# Upload Account Codes
To upload the CSV file, navigate to the Administration page and then select the Account Codes tab.
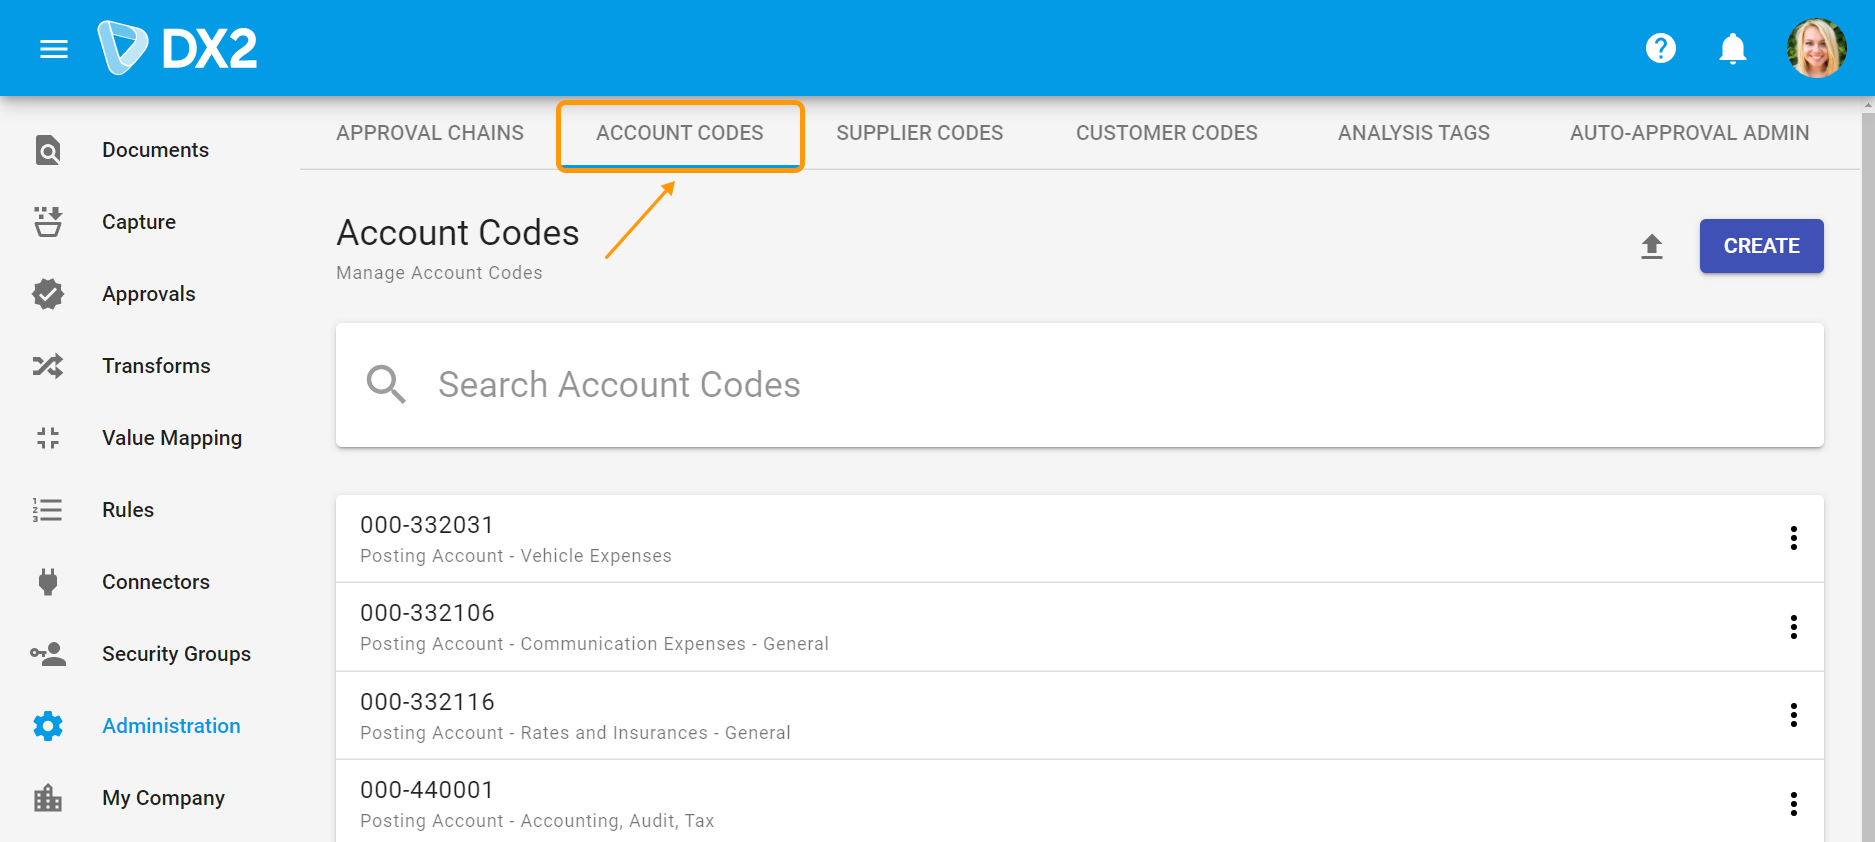
Click on the upload icon in the top right corner.

In the window that opens, select your Account Code csv file. Then click on the Upload button.
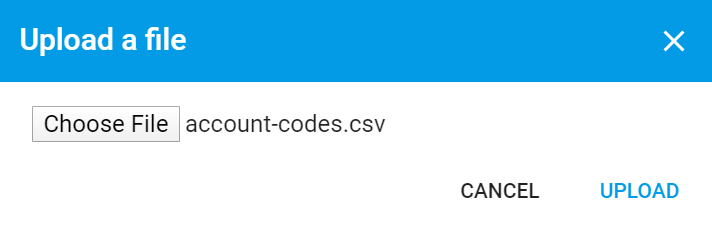
TIP
If there are any issues with the CSV file format, an error message will be displayed at the top of the page and the file will not be uploaded. Please ensure the upload file is in the correct format as shown in the Set up Account Codes section.
Error example:

# Manual Creation and Modification of Account Codes
Accounts can be created and/or modified manually. This is useful when it does not involve a high volume of accounts to be created or modified at a time.
Use the Create button in the Account Codes tab under Administration.

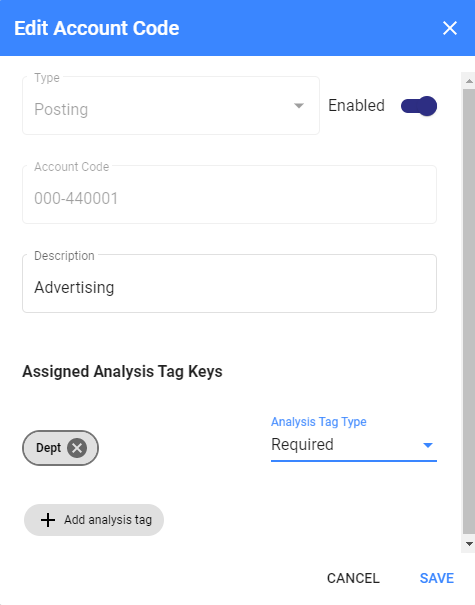
In the Create New Account Code window provide the mandatory information such as Account Type, Account Code and Description.
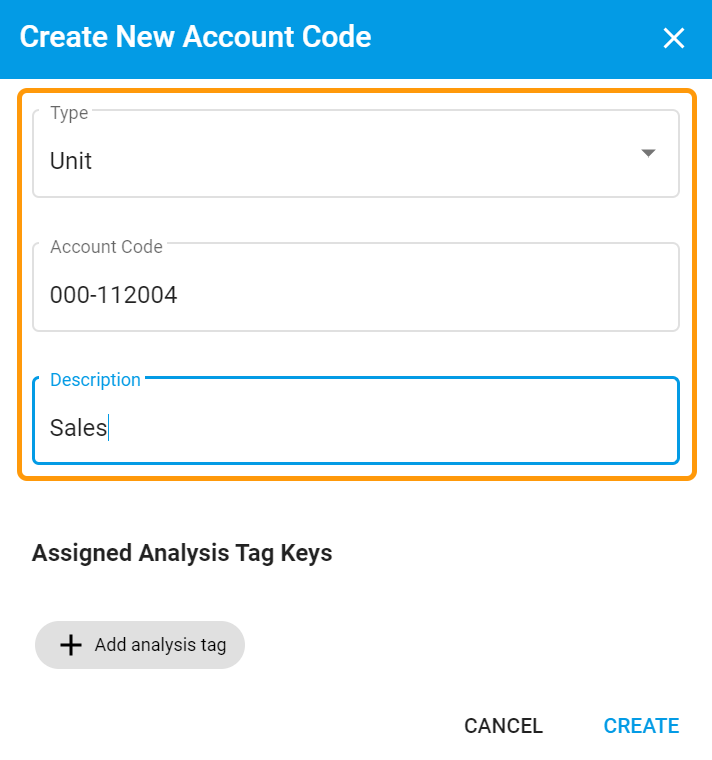
Optionally, you can assign Analysis Tag Keys to the account.
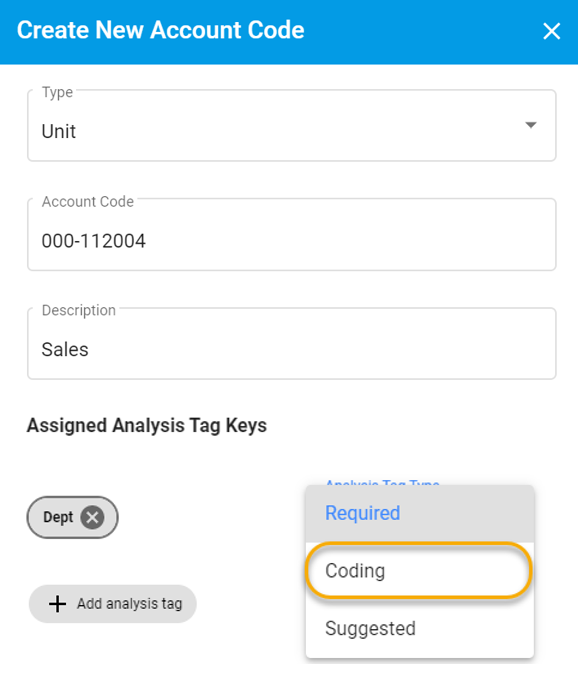
On assigning a key it will default to Required. It can be changed to Coding or Suggested. Only Analysis Tag definitions which are enabled can be set up as Required.
TIP
Assigning Analysis Tag Keys to an account is Optional. Account codes can be set up without Analysis keys.
Once an account code has been set up, the account code description and Assigned Analysis Tag Keys can be changed at any point of time.
# Account Code Analysis Tag Types
When coding an invoice, each Account Code can have associated Analysis Tags. The associated Analysis Tags can be one of 3 types:
- Required – Value must be provided before final approval
- Suggested – Value can optionally be added or the Tag completely removed from the coding line
- Coding – Value must be provided before confirming the coding and cannot be changed after the coding is confirmed, unless the approver sends it back for 'Recode' in the event the value is incorrect.
To set up or change an Analysis Tag Type, click on Administration/Account Codes 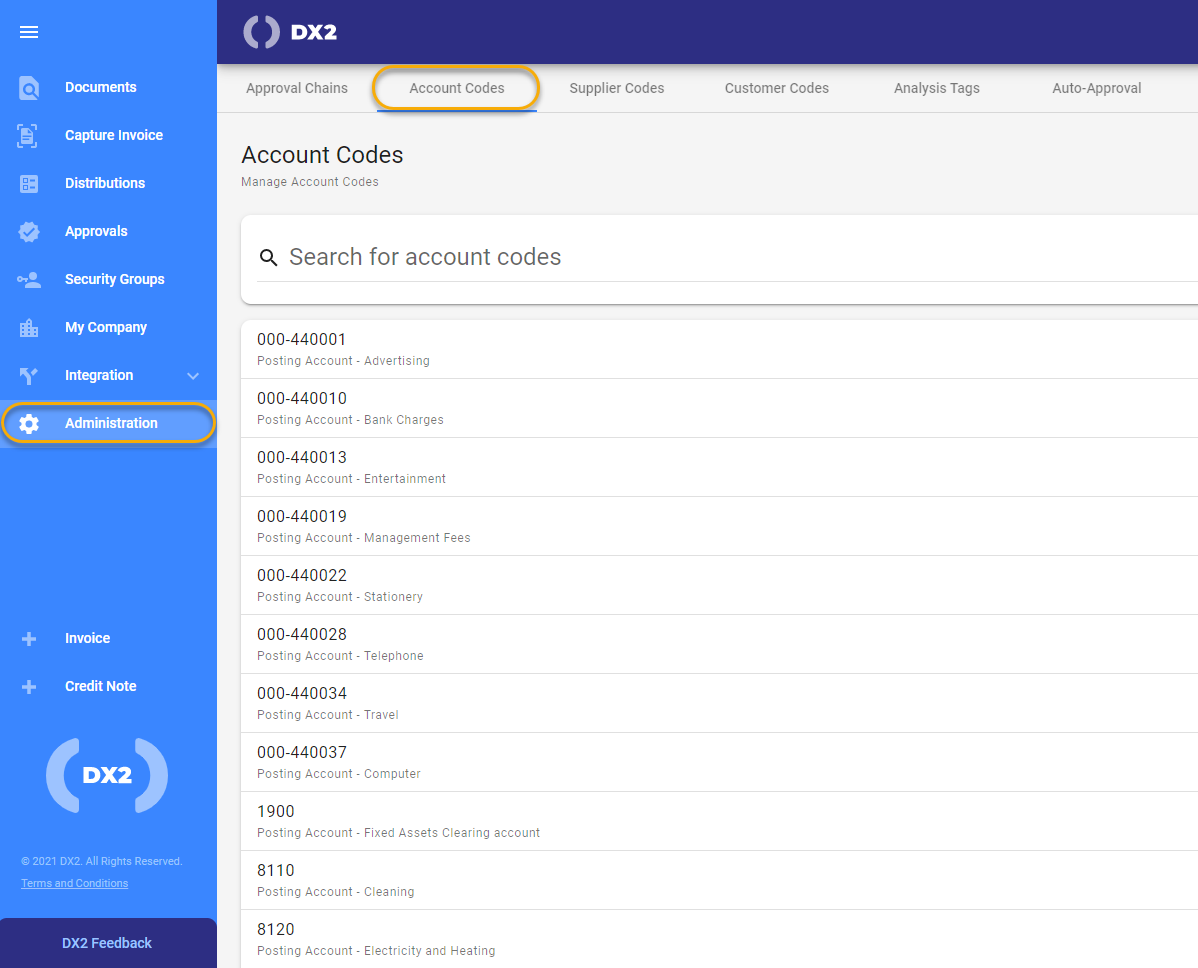
Search for the Account Code you would like to update then select Edit to edit the Account Code.
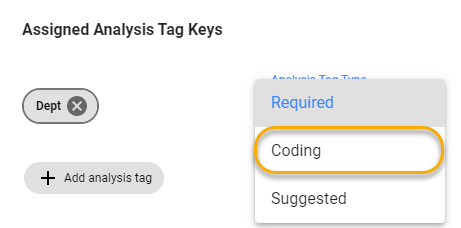
Select the drop down to see the following options
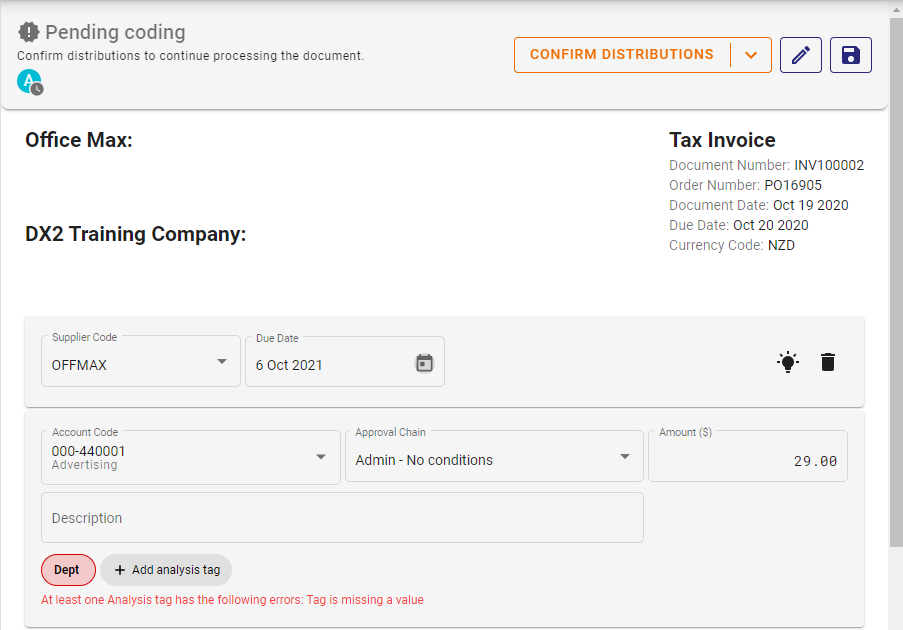
The Invoice can be coded and the distributions confirmed as usual.

In this Pending Coding example, because the Analysis Tag Type 'Dept' was set up as 'Coding'. However the user did not select an analysis tag, therefore an error displays.
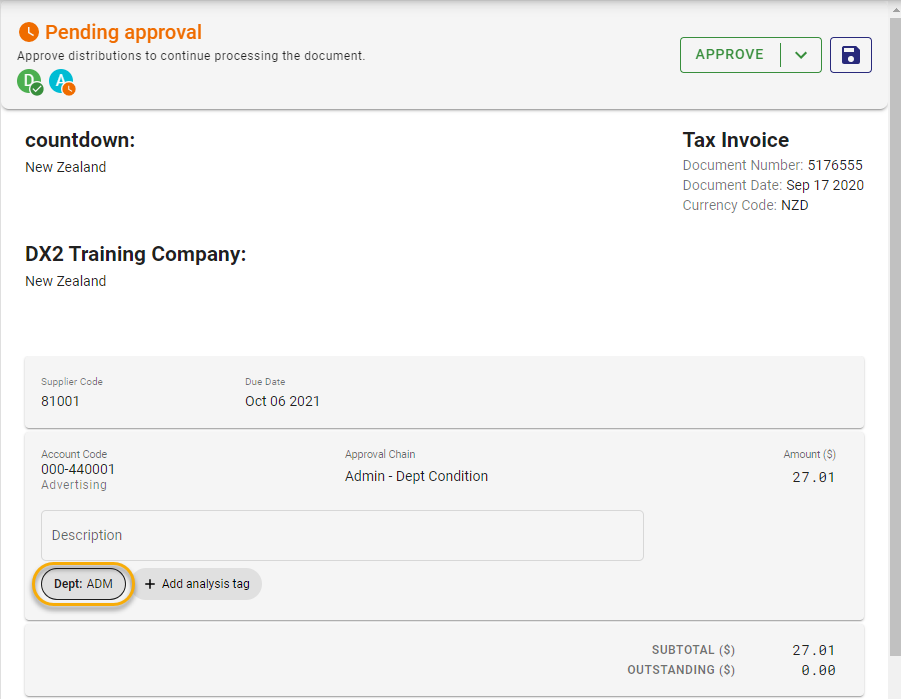
In this Pending Approval example, because the Analysis Tag Type 'Dept' was set up as 'Coding' and the coding has been confirmed, the invoice coding can no longer be changed.
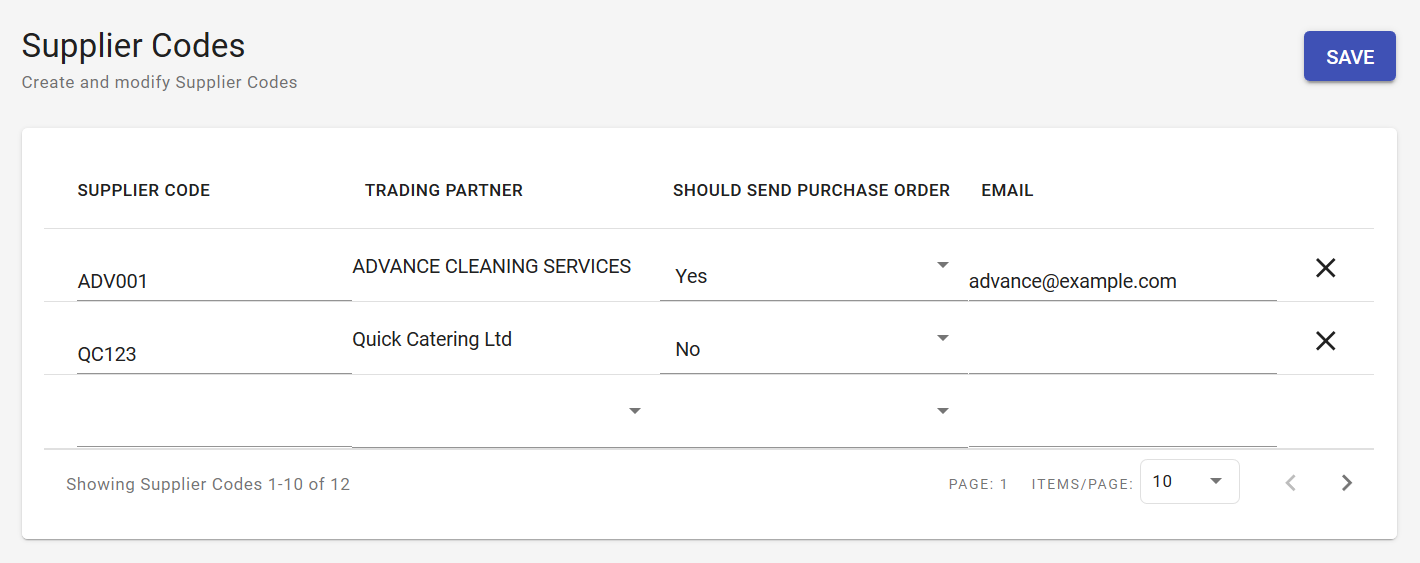
# Optional: Set up Supplier Codes
The supplier code is how your financial system identifies the Trading Partner.
Setting up supplier codes can be done through the Supplier Codes tab in the Administration page. This is an optional step, but is recommended to reduce the amount of errors, especially when first getting started with DX2.
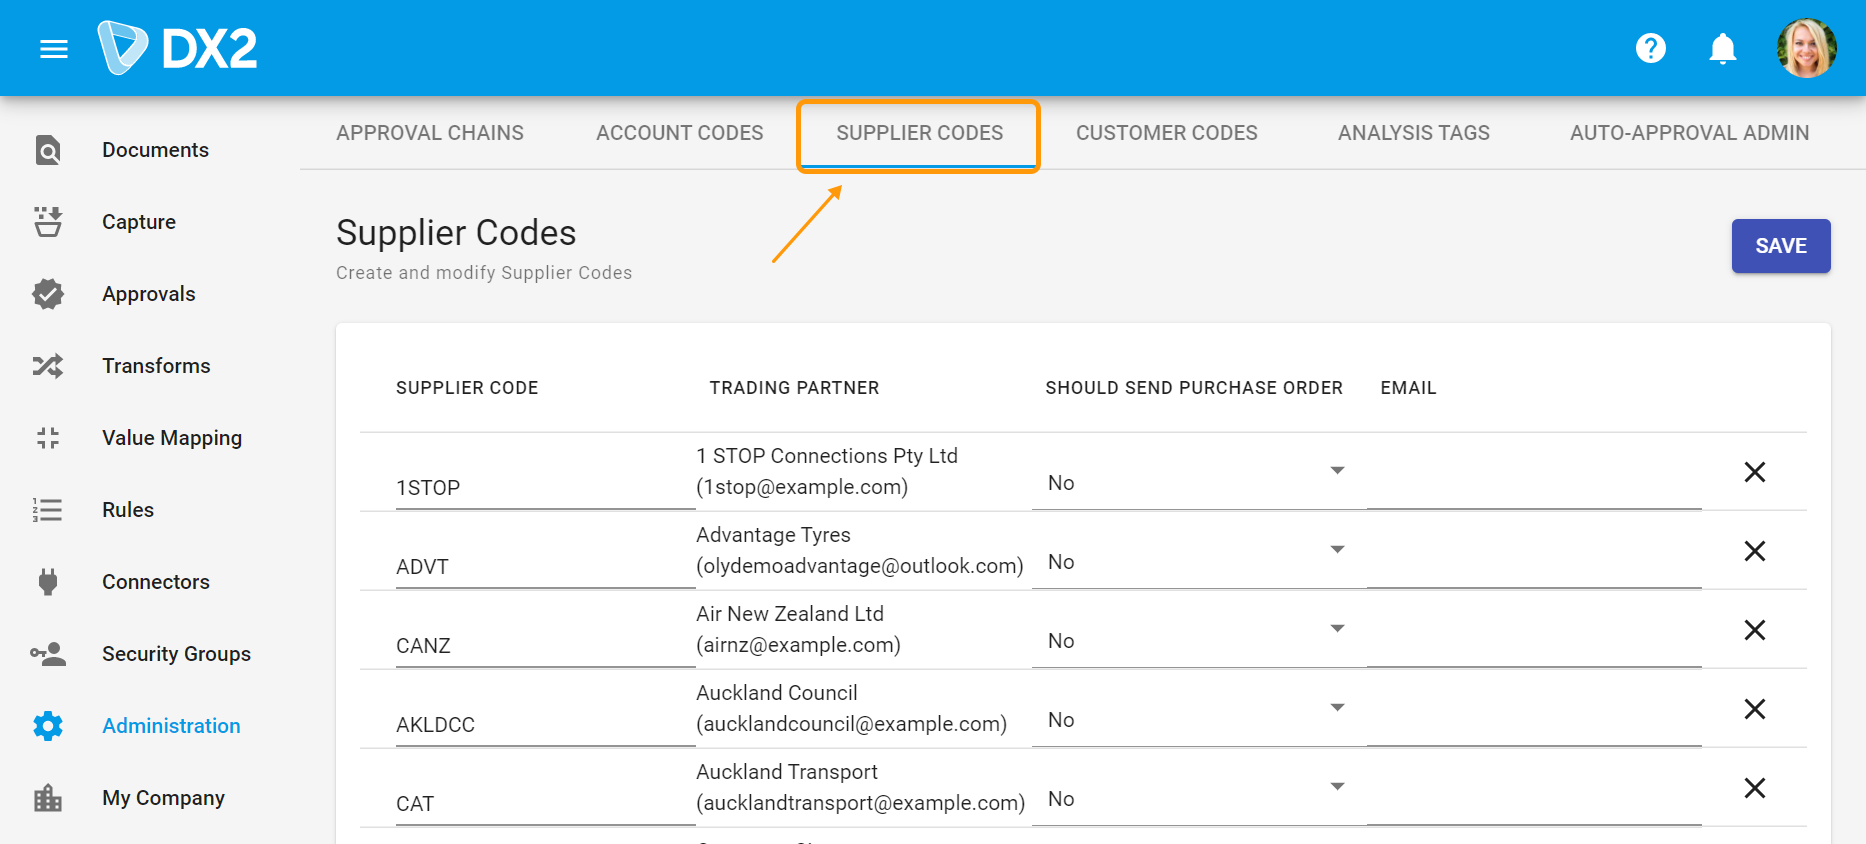
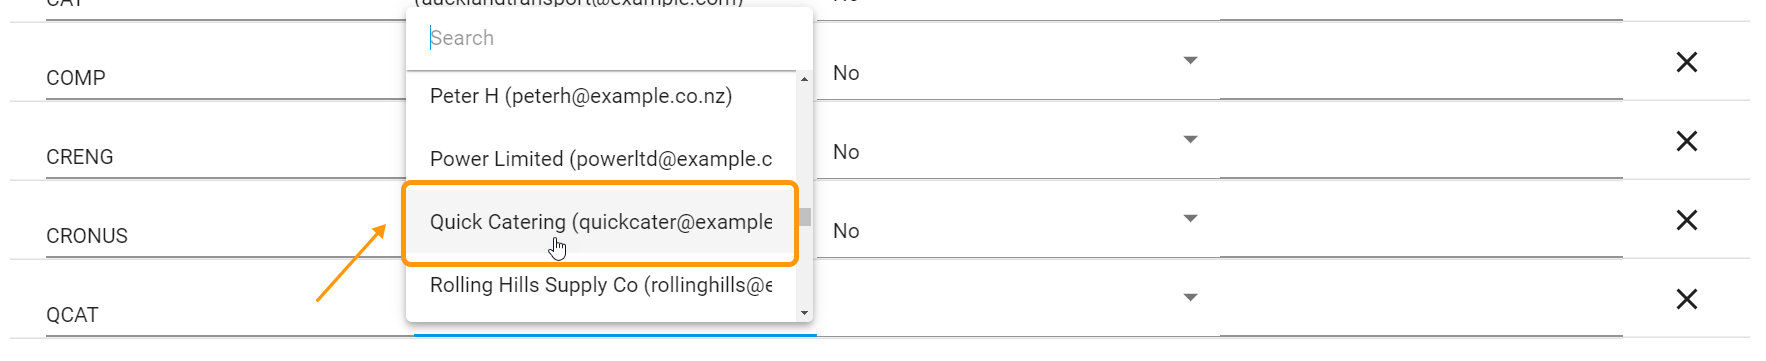
For existing Trading Partners, you can add supplier codes from the Administration page. Simply type in a supplier code and pick a Trading Partner to associate it with.
If you'd like to enable emailing purchase orders to this supplier, select Yes from the drop down list for the Should Send Purchase Order column and provide the email address. If left blank, the Should Send Purchase Order column will default to No.
An email address can be provided only when it is set to Yes.
TIP
Only one email address can be set up per supplier code to email the purchase order to.
WARNING
These must correspond to the supplier codes in your financial system, otherwise it will reject the Document.
# Optional: Set up Customer Codes
Customer code(s) need to be set up before any customer related document exchange can be used in DX2. Customer code is how your financial system identifies the Trading Partner.
Setting up customer codes can be done through the Customer Codes tab in the Administration page. This is an optional step, but is recommended to reduce the amount of errors, especially when first getting started with DX2.
For existing Trading Partners, you can add customer codes from the Administration page. Simply type in a customer code and pick a Trading Partner to associate it with.

WARNING
These must correspond to the customer codes in your financial system, otherwise it will reject the Document.
# Optional: Batch Upload for Supplier Codes and Customer Codes
To do a batch upload of Trading Partners and their Supplier Codes and/or Customer Codes, go to the Trading Partners Page and click Batch Upload.
You will need to provide a CSV file in the following format:
| Company Name | Email Address | Supplier Code | Customer Code |
|---|---|---|---|
| Rolling Hills Supply | rollinghills@example.com | ROLLINGHILLS | ROLLINGHILLS |
| Computer City | computercity@example.com | CCITY |
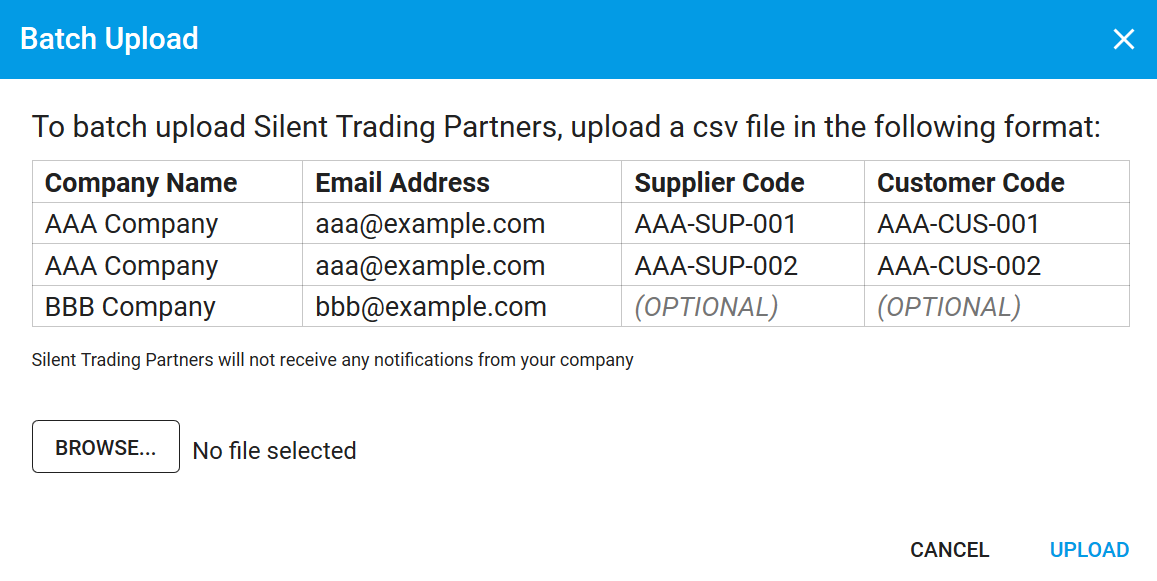
TIP
Uploading Supplier Codes using batch upload will set the SHOULD SEND PURCHASE ORDER field to No and the EMAIL field will be blank. These fields can be updated later if a supplier needs the purchase order to be emailed to them.
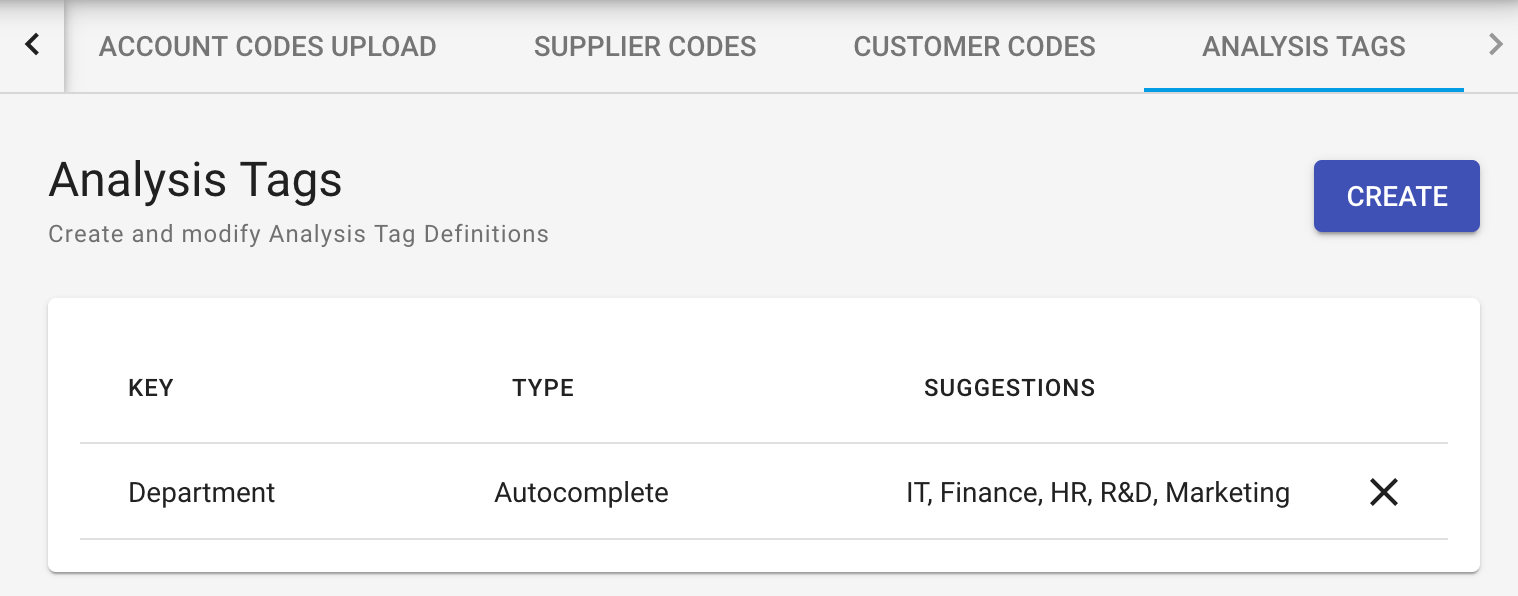
To add analysis tag definitions, go to Administration, then to the Analysis Tags tab and click Create.
# Set up Auto-Approval Admin
If DX2 Purchase is being used, invoices can be auto approved if the conditions listed below are met.
- The purchase order exists in the DX2 portal and has been approved.
- The purchase order and invoice are for the same Trading Partner.
- The purchase order is fully receipted.
- The Invoice subtotal amount (ex Tax) matches the purchase order subtotal amount (ex Tax) as per the Auto-Approval rules setup.
The auto approval rules concerning the invoice and purchase order amount is setup under Auto-Approval Admin and can be accessed from Administration.
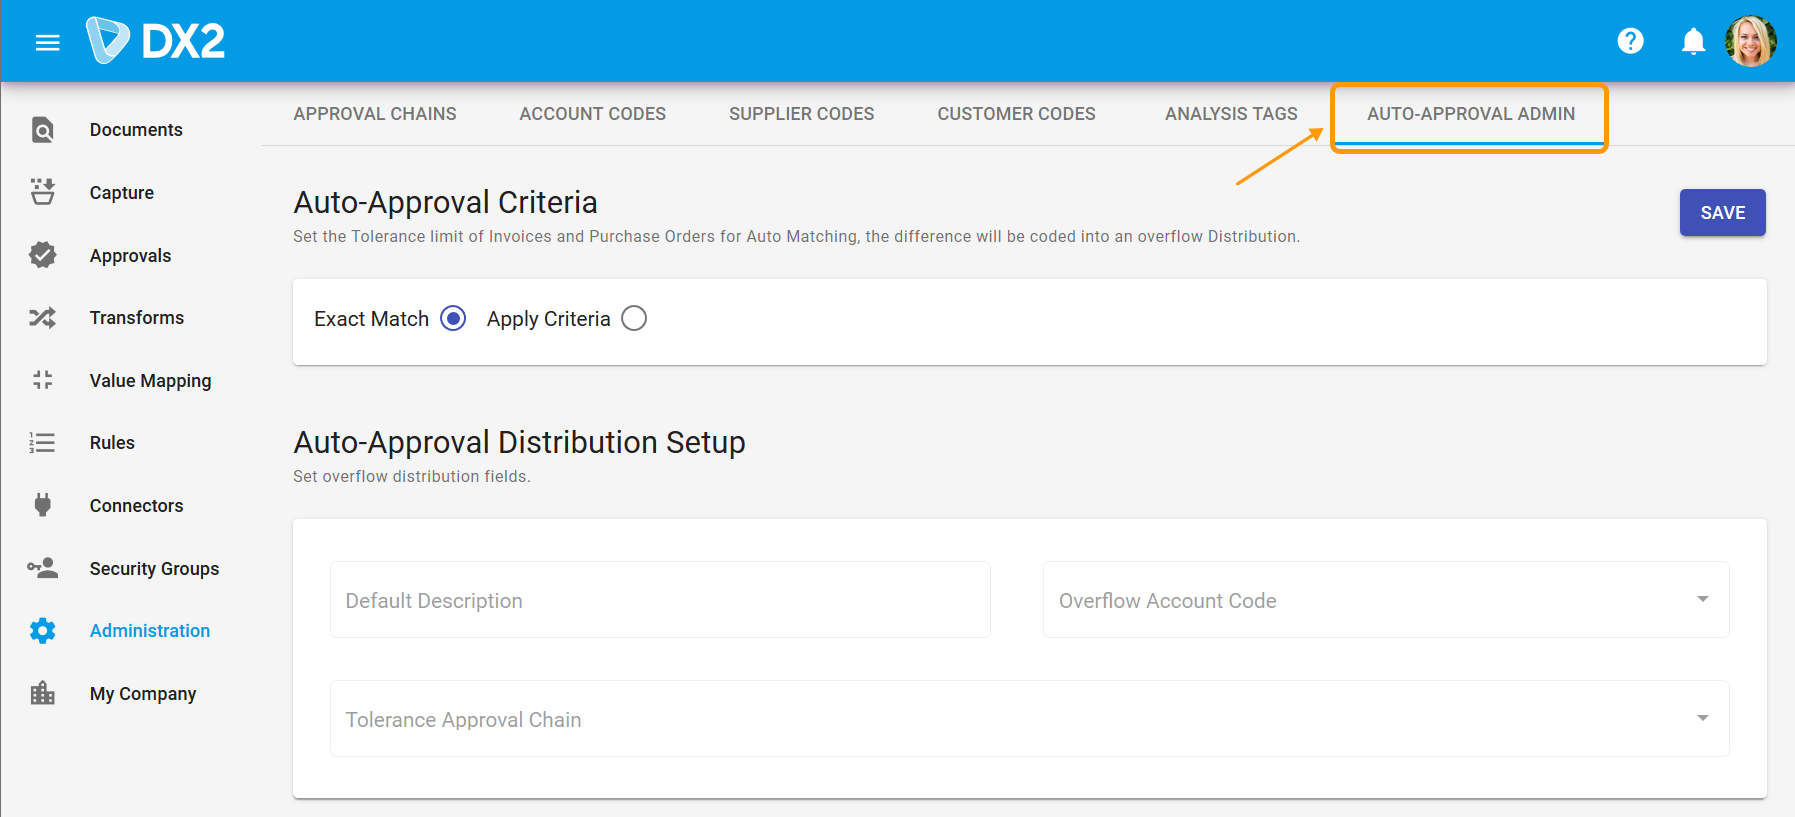
# Set up Auto-Approval Criteria
When accessed the first time, the auto-approval criteria will default to Exact Match and can be changed to Apply Criteria.
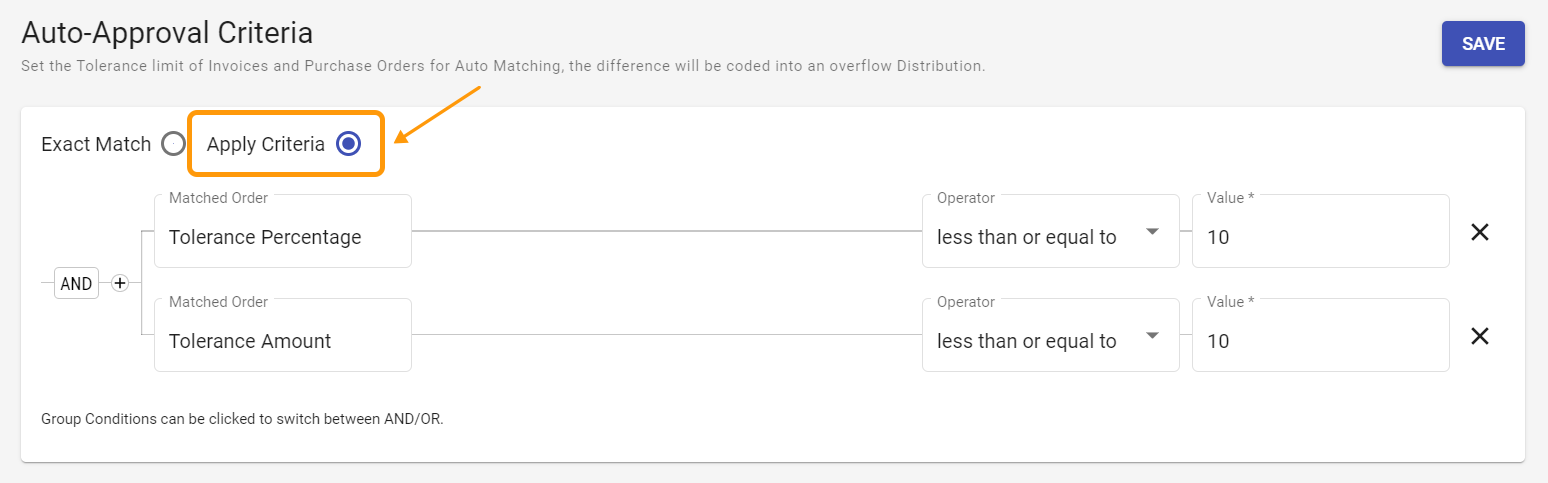
Using the exact match setting will apply the two matching rule only when the subtotal (ex Tax) on the purchase order and invoice matches exactly.
The exact match rule can be extended by setting up criteria to define the tolerance amount allowed in auto-approval. Criteria available for this is Tolerance Amount and Tolerance Percentage. These can be used individually or together.
# Examples of Auto Approval Admin setup
Some examples of setting up the Auto-Approval criteria are below. These examples are with the Purchase Order subtotal (ex Tax) as $100.
All these examples are where the rest of the conditions for auto-approval are fulfilled.
# Using Exact Match

In the above example the Invoice will be auto approved if the subtotal (ex Tax) for it is $100.
# Using only Tolerance Amount
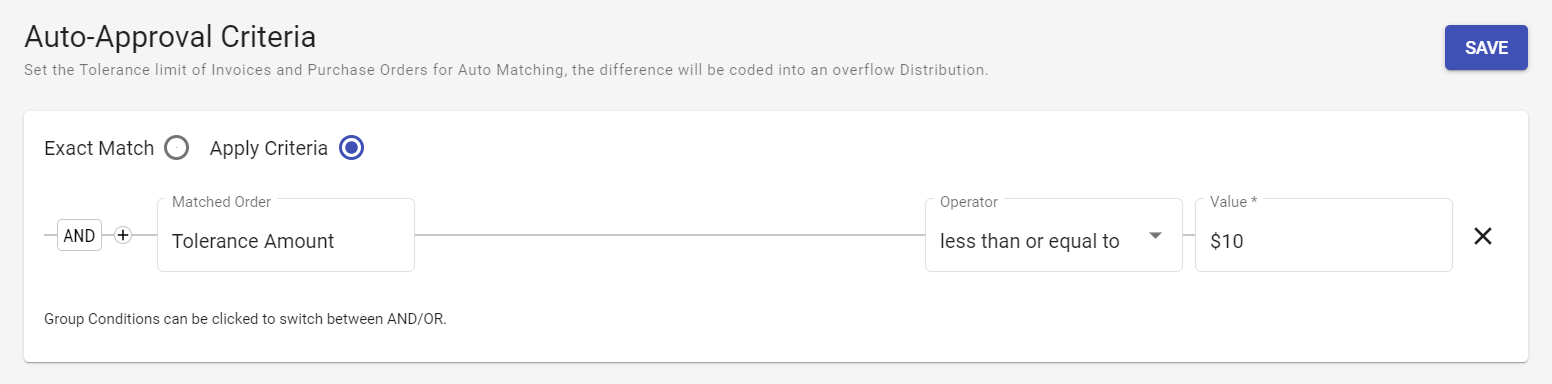
In this example, the Invoice will be auto approved if the subtotal (ex Tax) on it is between $90 to $110.
# Using only Tolerance Percentage

In this example, the Invoice will be auto approved if the subtotal (ex Tax) on it is between $95 to $105.
# Using both Tolerance Amount and Tolerance Percentage
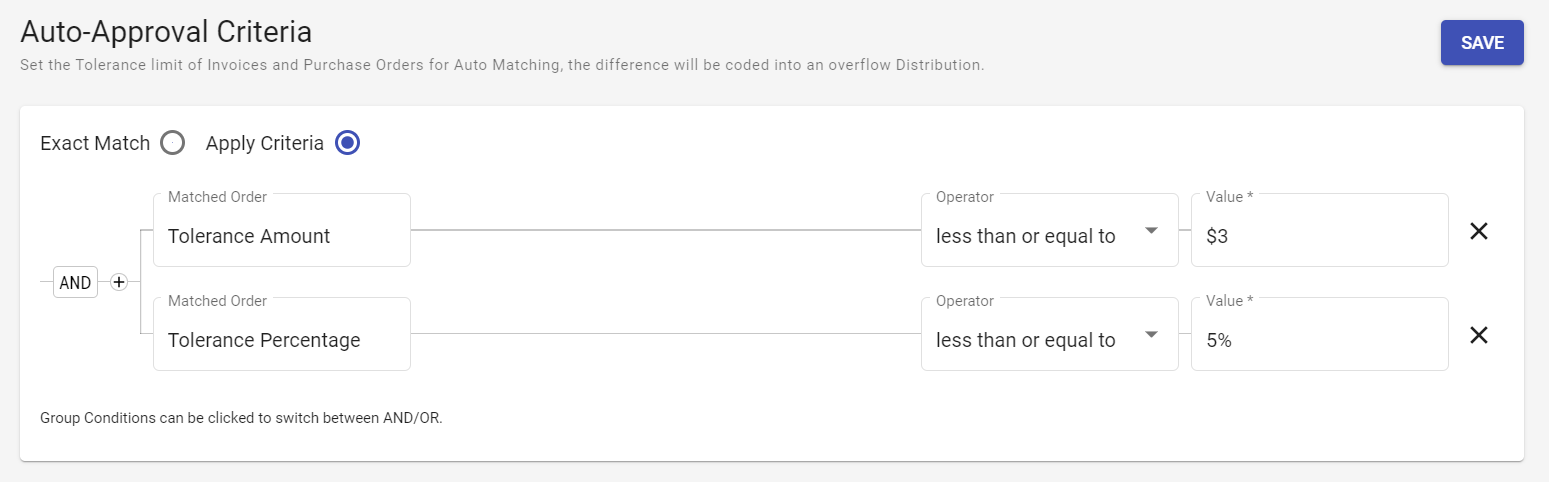
In this example, the Invoice will be auto approved if the subtotal (ex Tax) on it is between $97 to $103.
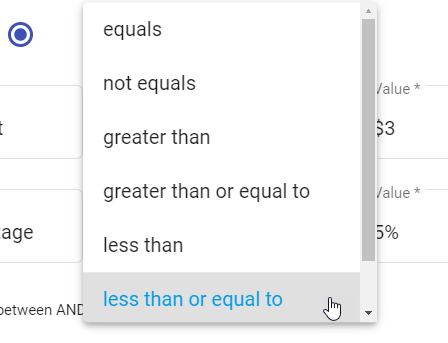
The criteria can also be defined with the below operators.
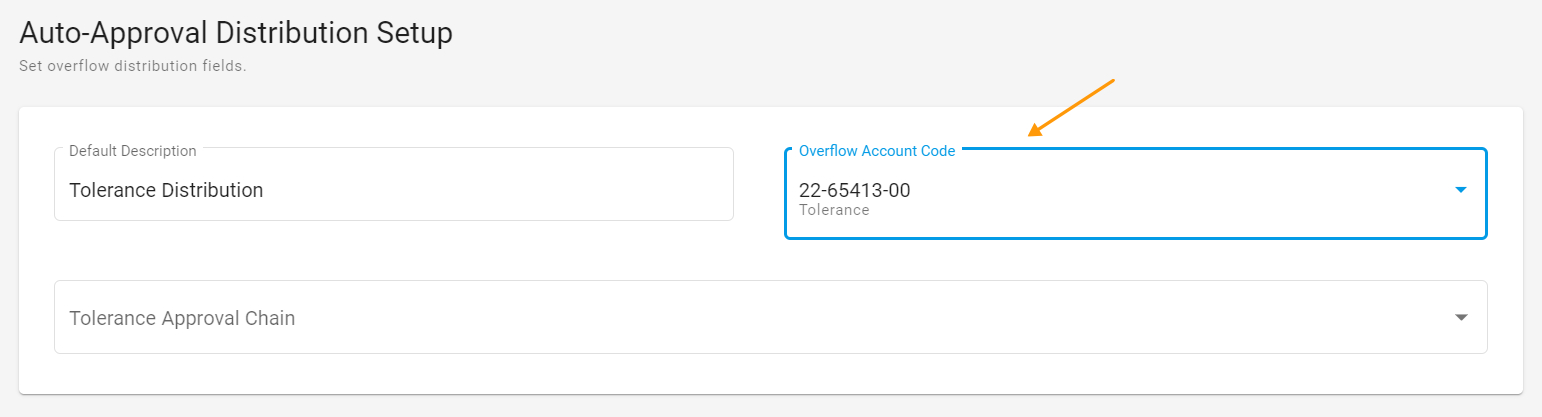
# Set up Auto-Approval Distribution
If an invoice is being auto approved the overflow amount, if any, will be created as a separate distribution line in addition to the ones being copied from the purchase order. This requires some default values to be set up.
TIP
If the invoice subtotal (ex Tax) is less than the purchase subtotal (ex Tax) the additional line will be with a negative amount.
Enter the default description you'd like to be used on the overflow distribution line. This will default to 'Tolerance Description' but can be changed.
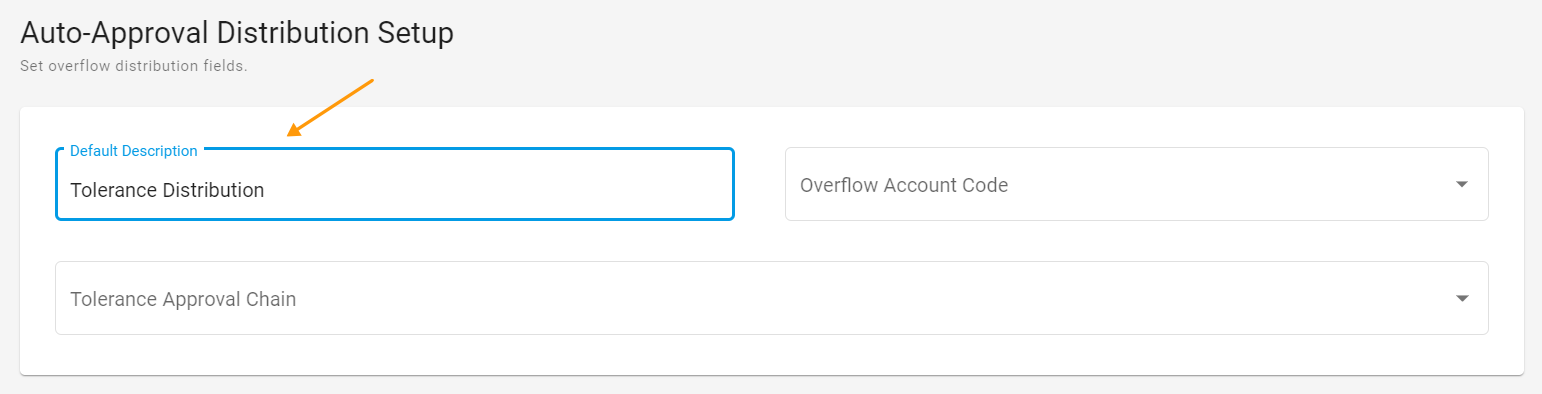
Enter or select the account code to be used on the overflow distribution line.
Enter or select the approval chain to be used on the overflow distribution line.

Click on the Save button to save the criteria.
